26 Sep 2020 -
Comments
Anytime a developer uses .orElseThrow() they are trying to express one of two things:
- “If the value is missing, that would be unexpected (but possible) and we want to throw an exception”
- “At this point, there should definitely be a value here”
That first case is part of what Optional was designed to do. For example, you might have some code that looks like the following:
public void deactivateUser(int userId) {
    User user = userRepository.findById(userId)
        .orElseThrow(() -> new NotFoundException(...));

    user.deactivate();
}
This is a totally acceptable usage of Optional. An invalid id would be exceptional and there’s no way to catch that at compile time. The non-optional version of this code is as follows:
public void deactivateUser(int userId) {
    User user = userRepository.findById(userId)

    if (user == null) {
        throw new NotFoundException(...);
    }

    user.deactivate();
}
Although not as modern, the logic intuitively makes sense and expresses the desired behavior.
So what’s the problem?
Let’s consider the following code. What is the author trying to do?
// BEFORE
public class Person {
  ...

  public Optional<String> getFirstName() {
    ...
  }

  public Optional<String> getLastName() {
    ...
  }
}

public void printFullName(Person person) {
    person.getFirstName().ifPresent(firstName -> {
        String lastName = person.getLastName().orElseThrow(); // Last name is definitely there if they have a first name
        System.out.println(firstName + " " + lastName);
    });
}
I see this type of code often, although it may take different forms. Sometimes they pass an exception in (i.e. () -> new RuntimeException("This should never happen!")) and sometimes they use a naked .get(). But they all mean the same thing: I know something contextual that the compiler doesn’t know. But why? Being a strongly-typed language, Java’s compiler genuinely wants to help you. But the author of this code isn’t letting it help. When you write something like this, you should instead be asking yourself, “How can I help the compiler help me? How can I clue Java into this contextual information?”
So let’s look back at that example and think about what we are actually trying to say. First and last name are either both present or both absent. Since they are logically coupled (hence why the author was comfortable just calling .orElseThrow()) let’s group them together in the code as well. Instead of having two optional fields, let’s create a class with two required fields and then that class can be optional.
// AFTER
public class Name {
    private final String firstName;
    private final String lastName;

    // Constructor, getters, etc omitted for brevity
}

public class Person {
    ...
    public Optional<Name> getName() {
       ...
    }
    ...
}

public void printFullName(Person person) {
    person.getName().ifPresent(name -> {
        String firstName = name.getFirstName();
        String lastName = name.getLastName();
        System.out.println(firstName + " " + lastName);
    });
}
Now the compiler makes it impossible for someone to change something and accidentally end up in a situation where the last name is missing. And if you’re using JPA (like Hibernate) this can be a great use of @Embeddable and @Embedded.
In addition to hiding business-context, another place I commonly see this anti-pattern is hiding simple code flow context. What do you think of the following:
// BEFORE
public class Person {
  ...
  public void randomizeFavorites() {
    this.favoriteColor = Math.random() > 0.5 ? "Blue" : "Green";
    this.favoriteNumber = Math.floor(Math.random() * 100);
  }
}

public void spinWheel(Person person) {
  person.randomizeFavorites();

  // favoriteColor and favoriteNumber were just set above, so orElseThrow is safe
  String favoriteColor = person.getFavoriteColor().orElseThrow();
  String favoriteNumber = person.getFavoriteNumber().orElseThrow();

  System.out.println("New favorite color/number: " + favoriteColor + ", " + favoriteNumber);
}
Here, the author feels okay calling orElseThrow() since they know that the fields would have been set as part of randomizeFavorites(). But what if someone were to change that implementation such that it no longer set the favoriteNumber? Well, exceptions would start being thrown and the compiler couldn’t have saved you.
This one is a bit trickier, but I would probably improve this code by having the randomizeFavorites() method return what it did:
// AFTER
public class Person {
  ...
  public RandomFavoriteResult randomizeFavorites() {
    this.favoriteColor = Math.random() > 0.5 ? "Blue" : "Green";
    this.favoriteNumber = Math.floor(Math.random() * 100);
    return new RandomFavoriteResult(favoriteColor, favoriteNumber);
  }
}

public void spinWheel(Person person) {
  RandomFavoriteResult favorites = person.randomizeFavorites();

  String favoriteColor = favorites.getFavoriteColor();
  String favoriteNumber = favorites.getFavoriteNumber();

  System.out.println("New favorite color/number: " + favoriteColor + ", " + favoriteNumber);
}
Like the first example, here we’ve been able to introduce a new class to encapsulate the previously-hidden context. Now, if someone were to change that method to no longer set the favoriteNumber, something would have to change with that return type (and thus the usages of RandomFavoriteResult.getFavoriteNumber()). This dependency that spinWheel has on the implementation of randomizeFavorites is now discoverable and documented thanks to Java’s type-safety.
Conclusion
You’ve seen that using .orElseThrow() can often be a signal that you are hiding some context from the compiler. I challenge you to follow these smells and try to find ways to reorganize. Feel free to reach out in the comments below if this was helpful or if you’re stuck trying to refactor!
01 Jul 2020 -
Source -
Comments
Static/serverless website hosting is really cool. The economics and maintenance requirements are highly attractive (no paying for or managing servers) and the scalability is practically endless. Although there are many web hosts out there, I like hosting in S3 for the ease of maintenance, near-infinite scalability, and incredibly low cost. However, getting things set up just right can be challenging.
This (somewhat opinionated) guide walks through the steps of setting up a webpack react app to deploy to AWS S3/CloudFront using CodePipeline and CodeBuild when changes are pushed to the GitHub repo. And most of this will be set up using the AWS CDK (holy buzzwords!) This process is slightly adapted from what I am using in production to deploy the front-end of a Sudoku app I build called Supradoku.
Although S3 and CloudFront have incredibly low prices (compared to traditional hosting), we are going to want to make sure that we maximize our caching opportunities.
Here’s what we’ll cover:
- Configuring webpack to output the static assets
- Getting started with a CDK project
- Using the CDK to configure a bucket/CloudFront distribution for hosting
- Build a pipeline for CI/CD
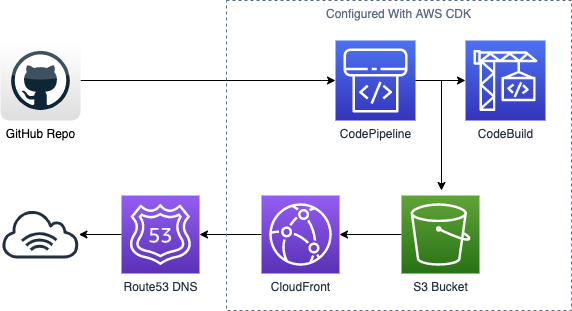
And here’s a diagram of how all the pieces fit together:
Before getting started, I assume you have the following:
- A GitHub account and repo set up for your react app
- An AWS account and a basic understanding of S3/CloudFront/Route53
- A domain name and hosted zone in Route53
- A bit of experience with webpack
- Knowledge of TypeScript (you could do this with plain JavaScript but that’s kinda lame)
- You’ve installed and configured the AWS CDK. If you haven’t done that yet, follow these steps
Setting up the project
The code for this project is broken up into two pieces: the source and the CDK project. If you haven’t already, go ahead and create a new GitHub project for the webpack project. I’ve hosted mine at https://github.com/gdpotter/webpack-react-sample.
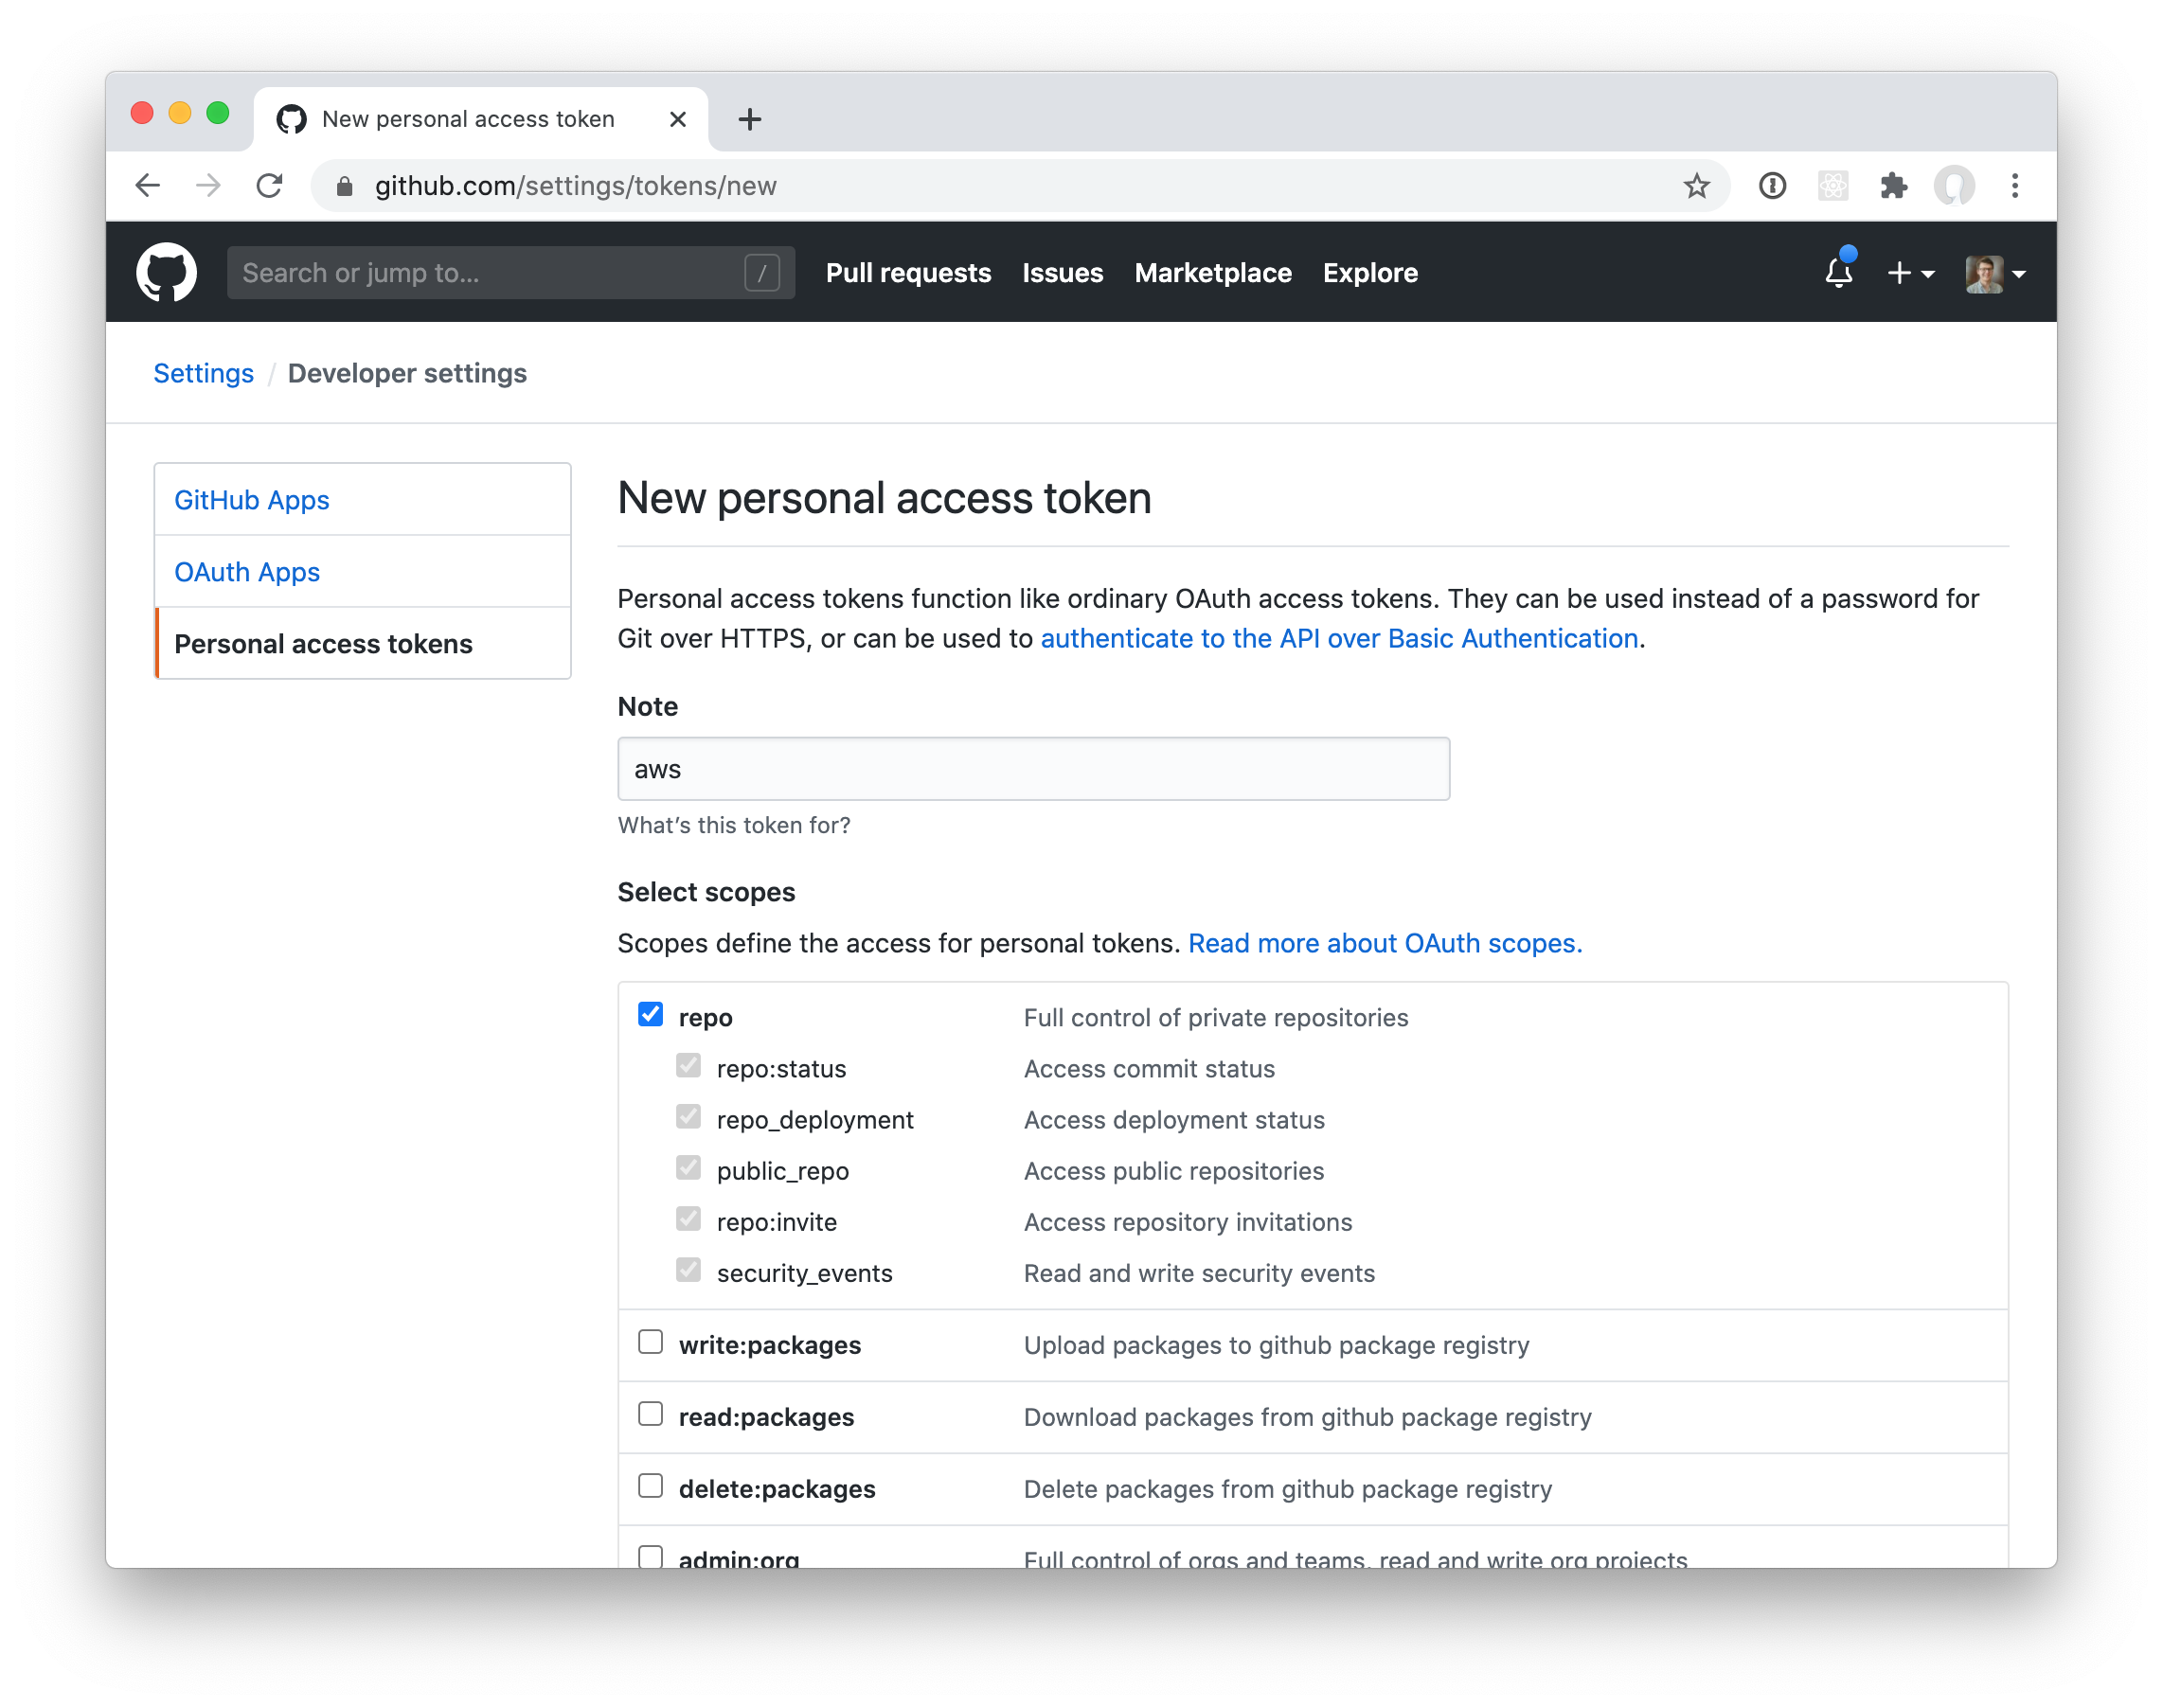
In order for CodePipeline to access the repository and register the webhook trigger, you’ll need to create a Personal Access Token. You can generate a token in the GitHub UI by going to Settings -> Developer Settings -> Personal access tokens. Be sure to select the repo scope:
Of course, this token is very sensitive and it would be a terrible idea to store it in plain text in the CDK stack. Instead, we will store it in AWS Secrets Manager. Go ahead and choose “Other type of secrets” and just drop the key in as plaintext.
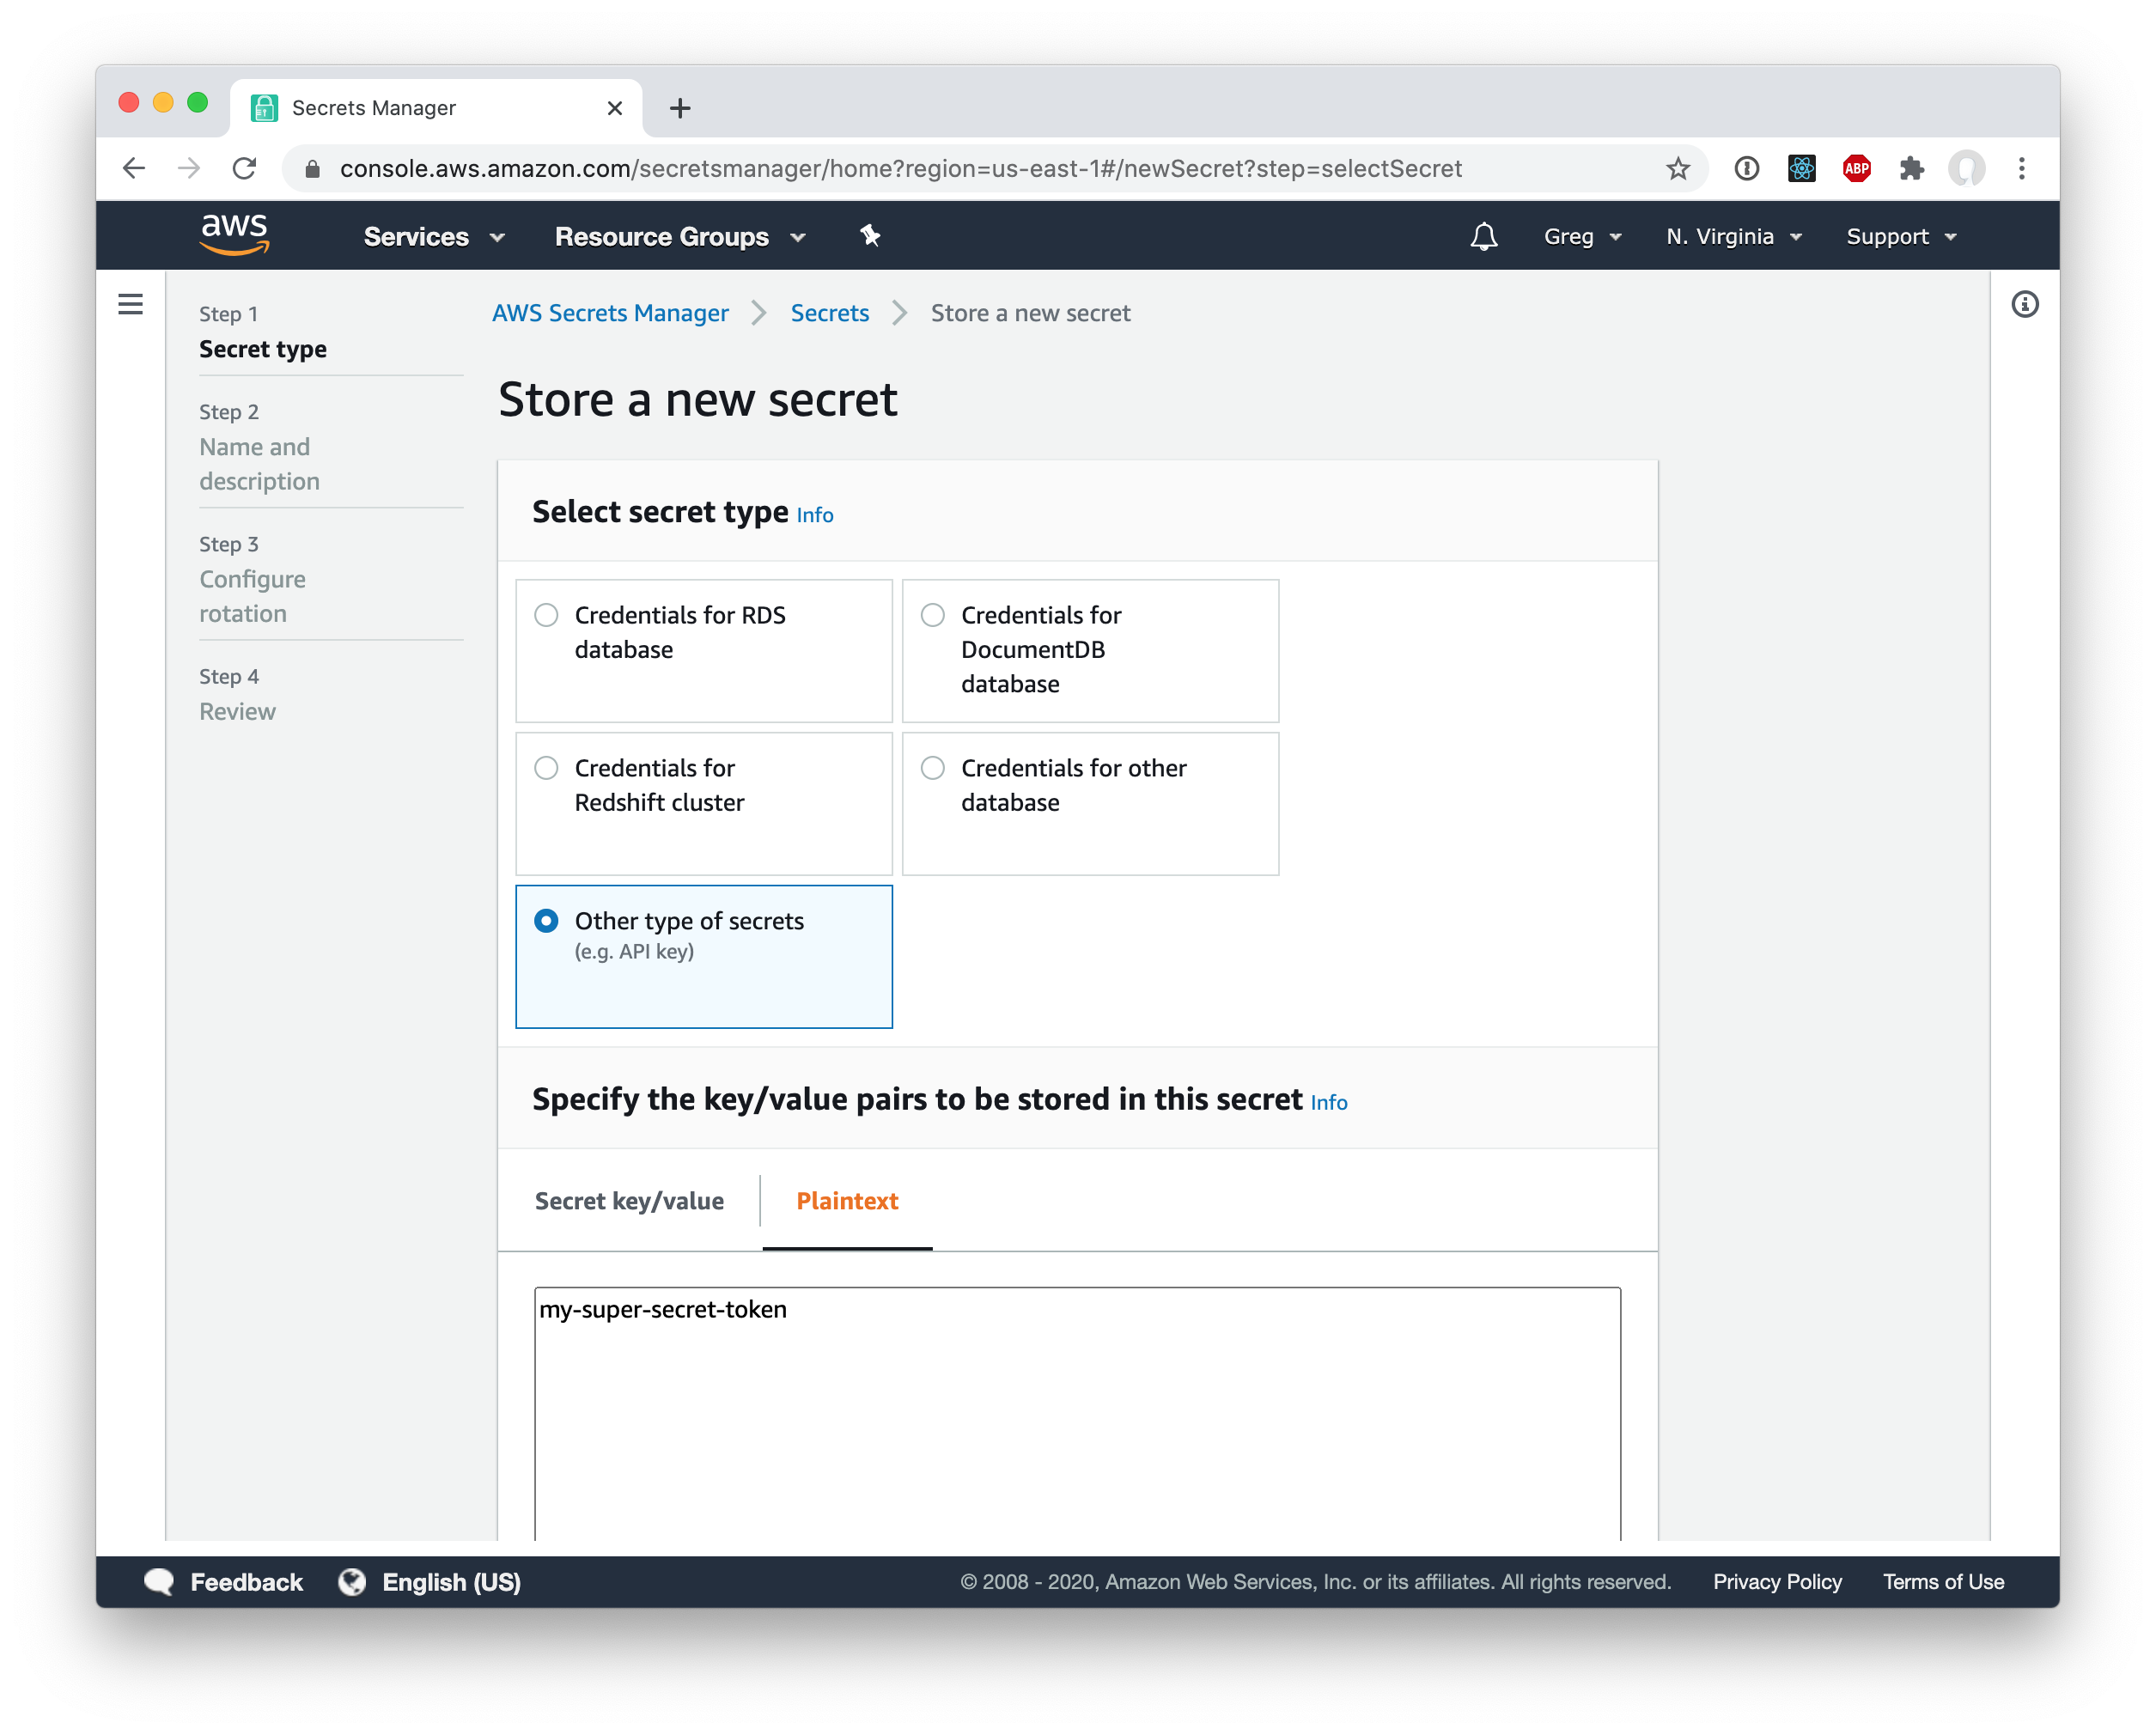
Then just give the secret a name (I called mine gdpotter-github) and continue to save the secret.
Also, I am assuming that you already have a Route53 hosted zone set up. If you don’t, you can follow the AWS guide for that (or probably countless other tutorials on the internet.)
Webpack configuration
In order to configure aggressive caching we need to make sure all static asssts (js, css, etc) are stored with a hash in the filename. Then, when the assets change, so do the file names and the browsers know to download a new file.
We also want to store all of our static files in a separate sub-directory (I called mine /static). This will help us later when setting up the CodePipeline. We’ll specify different caching headers for everything in that directory.
First, we need to set the output:
output: {
  path: path.join(__dirname, '/dist'),
  filename: process.env.production ? 'static/bundle.min.[contenthash].js' : 'static/bundle.min.[hash].js',
  publicPath: '/'
}
You’ll notice that I’m using [contenthash] for production but otherwise using [hash]. That’s because I am using hot module replacement along with webpack-dev-server when running locally. If you attempt to use [contenthash] you will see an error like the following when starting:
Cannot use [chunkhash] or [contenthash] for chunk in ‘static/bundle.min.[contenthash].js’ (use [hash] instead)
If you have any other types of output files (such as using MiniCssExtractPlugin or FaviconsWebpackPlugin), you’ll want to add /static to the output as well.
Next, you can run yarn run build (or you can use npm if you prefer) to build the dist directory. The output should look something like the following:
dist
├── index.html
└── static
    ├── 103b5fa18196d5665a7e12318285c916.svg
    └── bundle.min.e0bbd73336e3e1ed23cf.js
You can view the entire file here.
AWS CDK Configuration
If you haven’t already, go ahead and install/configure cdk using the AWS guide. I’m going to use typescript but if you want to use something else you should be able to easily translate my configuration. Make sure you install all of the following dependencies:
$ npm install @aws-cdk/core @aws-cdk/aws-s3 @aws-cdk/aws-cloudfront @aws-cdk/aws-iam @aws-cdk/aws-codebuild @aws-cdk/aws-codepipeline @aws-cdk/aws-codepipeline-actions @aws-cdk/aws-route53 @aws-cdk/aws-route53-targets @aws-cdk/aws-certificatemanager
Then go ahead and create a new empty stack. I’ve called mine ReactSampleStack and the file should look something like this:
import {App, Stack, StackProps} from "@aws-cdk/core";

export class ReactSampleStack extends Stack {

  constructor(app: App, id: string, props?: StackProps) {
    super(app, id, props);


  }
}
S3 Bucket and CloudFront Configuration
First, you’ll need to create a bucket:
const webappBucket = new Bucket(this, 'Bucket', {
  bucketName: '<your bucket name>'
});
And an OAI and IAM policy that we will later grant to the CloudFront distribution:
const cloudFrontOAI = new OriginAccessIdentity(this, 'OAI', {
  comment: 'OAI for react sample webapp.',
});

const cloudfrontS3Access = new PolicyStatement();
cloudfrontS3Access.addActions('s3:GetBucket*');
cloudfrontS3Access.addActions('s3:GetObject*');
cloudfrontS3Access.addActions('s3:List*');
cloudfrontS3Access.addResources(webappBucket.bucketArn);
cloudfrontS3Access.addResources(`${webappBucket.bucketArn}/*`);
cloudfrontS3Access.addCanonicalUserPrincipal(
  cloudFrontOAI.cloudFrontOriginAccessIdentityS3CanonicalUserId
);

webappBucket.addToResourcePolicy(cloudfrontS3Access);
You’ll find a lot of guides online telling you to enable static site hosting for the s3 bucket. We are not doing that because we don’t actually want the bucket to be public and we instead want to host the content via CloudFront. Why? For starters, S3’s native static site hosting does not support HTTPS certificates.
Speaking of certificates, let’s use AWS’s Certificate Manager to generate an SSL cert. Since we already have a Route53 hosted zone, we can do DNS Validation right from CDK:
const hostedZone = HostedZone.fromLookup(this, 'HostedZone', {
  domainName: 'gdpotter.com',
  privateZone: false
});

const certificate = new DnsValidatedCertificate(this, 'Certificate', {
  domainName: 'react-test.gdpotter.com',
  hostedZone
});
And now we’ll create the CloudFront distribution to point to that s3 bucket:
const distribution = new CloudFrontWebDistribution(this, 'Cloudfront', {
  originConfigs: [
    {
      s3OriginSource: {
        s3BucketSource: webappBucket,
        originAccessIdentity: cloudFrontOAI
      },
      behaviors: [
        {isDefaultBehavior: true}
      ]
    }
  ],
  errorConfigurations: [
    {
      errorCode: 404,
      responseCode: 200,
      responsePagePath: '/index.html',
      errorCachingMinTtl: 0
    }
  ],
  priceClass: PriceClass.PRICE_CLASS_100,
  aliasConfiguration: {
    acmCertRef: certificate.certificateArn,
    names: ['react-test.gdpotter.com']
  }
});
You can see that we are rewriting 404 errors as 200’s pointing to /index.html. That is so that if you are using something like react-router and the user can go to http://mysite.com/some-path. There is no some-path file or directory in s3 but as long as we serve the index.html file, the JavaScript will know how to handle that request.
You’ll also notice that I’m using PRICE_CLASS_100. That’s purely optional and I’m doing it just because I’m cheap. You can learn more about price classes here.
And finally we will create an DNS record to point to our new distribution:
new ARecord(this, 'Alias', {
  zone: hostedZone,
  recordName: 'react-test',
  target: RecordTarget.fromAlias(new CloudFrontTarget(distribution))
});
Using CodePipeline to build/deploy the webpack project
At this point you can run cdk deploy and see a fully functional S3 bucket serving content via CloudFront. The only problem is that there’s nothing in the bucket yet! You could drop some files in there by hand but we want this to be fully automated.
There’s going to be 3 different artifacts in this pipeline. One for the sources (from GitHub) and two for the webpack output. I’m going to be separating the index.html from the static assets. So let’s configure those now:
const sourceOutput = new Artifact();
const buildHtmlOutput = new Artifact('base');
const buildStaticOutput = new Artifact('static');
Our pipeline is going to have 3 stages which I will talk abut individually:
new Pipeline(this, 'Pipeline', {
  stages: [
  ]
});
First, we need to get the sources from GitHub. This is where that token from earlier comes into play. This uses the gdpotter-github token to access the gdpotter/webpack-react-sample repository:
{
  stageName: 'Source',
  actions: [
    new GitHubSourceAction({
      actionName: 'Checkout',
      owner: 'gdpotter',
      repo: 'webpack-react-sample',
      oauthToken: SecretValue.secretsManager('gdpotter-github'),
      output: sourceOutput,
      trigger: GitHubTrigger.WEBHOOK,
    })
  ]
},
Next we will use AWS CodeBuild to actually invoke webpack and build the project. I’m putting the buildspec directly in the CDK stack but you could also define in the the repo. I like having it here so that I can reference the artifact names rather than rely on matching those up across different files.
{
  stageName: 'Build',
  actions: [
    new CodeBuildAction({
      actionName: 'Webapp',
      project: new PipelineProject(this, 'Build', {
        projectName: 'ReactSample',
        buildSpec: BuildSpec.fromObject({
          version: '0.2',
          phases: {
            install: {
              commands: [
                'npm install'
              ]
            },
            build: {
              commands: 'npm run build'
            }
          },
          artifacts: {
            'secondary-artifacts': {
              [buildHtmlOutput.artifactName as string]: {
                'base-directory': 'dist',
                files: [
                  '*'
                ]
              },
              [buildStaticOutput.artifactName as string]: {
                'base-directory': 'dist',
                files: [
                  'static/**/*'
                ]
              }
            }
          }
        }),
        environment: {
          buildImage: LinuxBuildImage.STANDARD_4_0,
        }
      }),
      input: sourceOutput,
      outputs: [buildStaticOutput, buildHtmlOutput]
    })
  ]
},
Here I define two different artifacts:
- One for everything in the root directory (but not any child directories) using the
* matcher
- One for everything in the
static directory and all its children using the static/**/* matcher
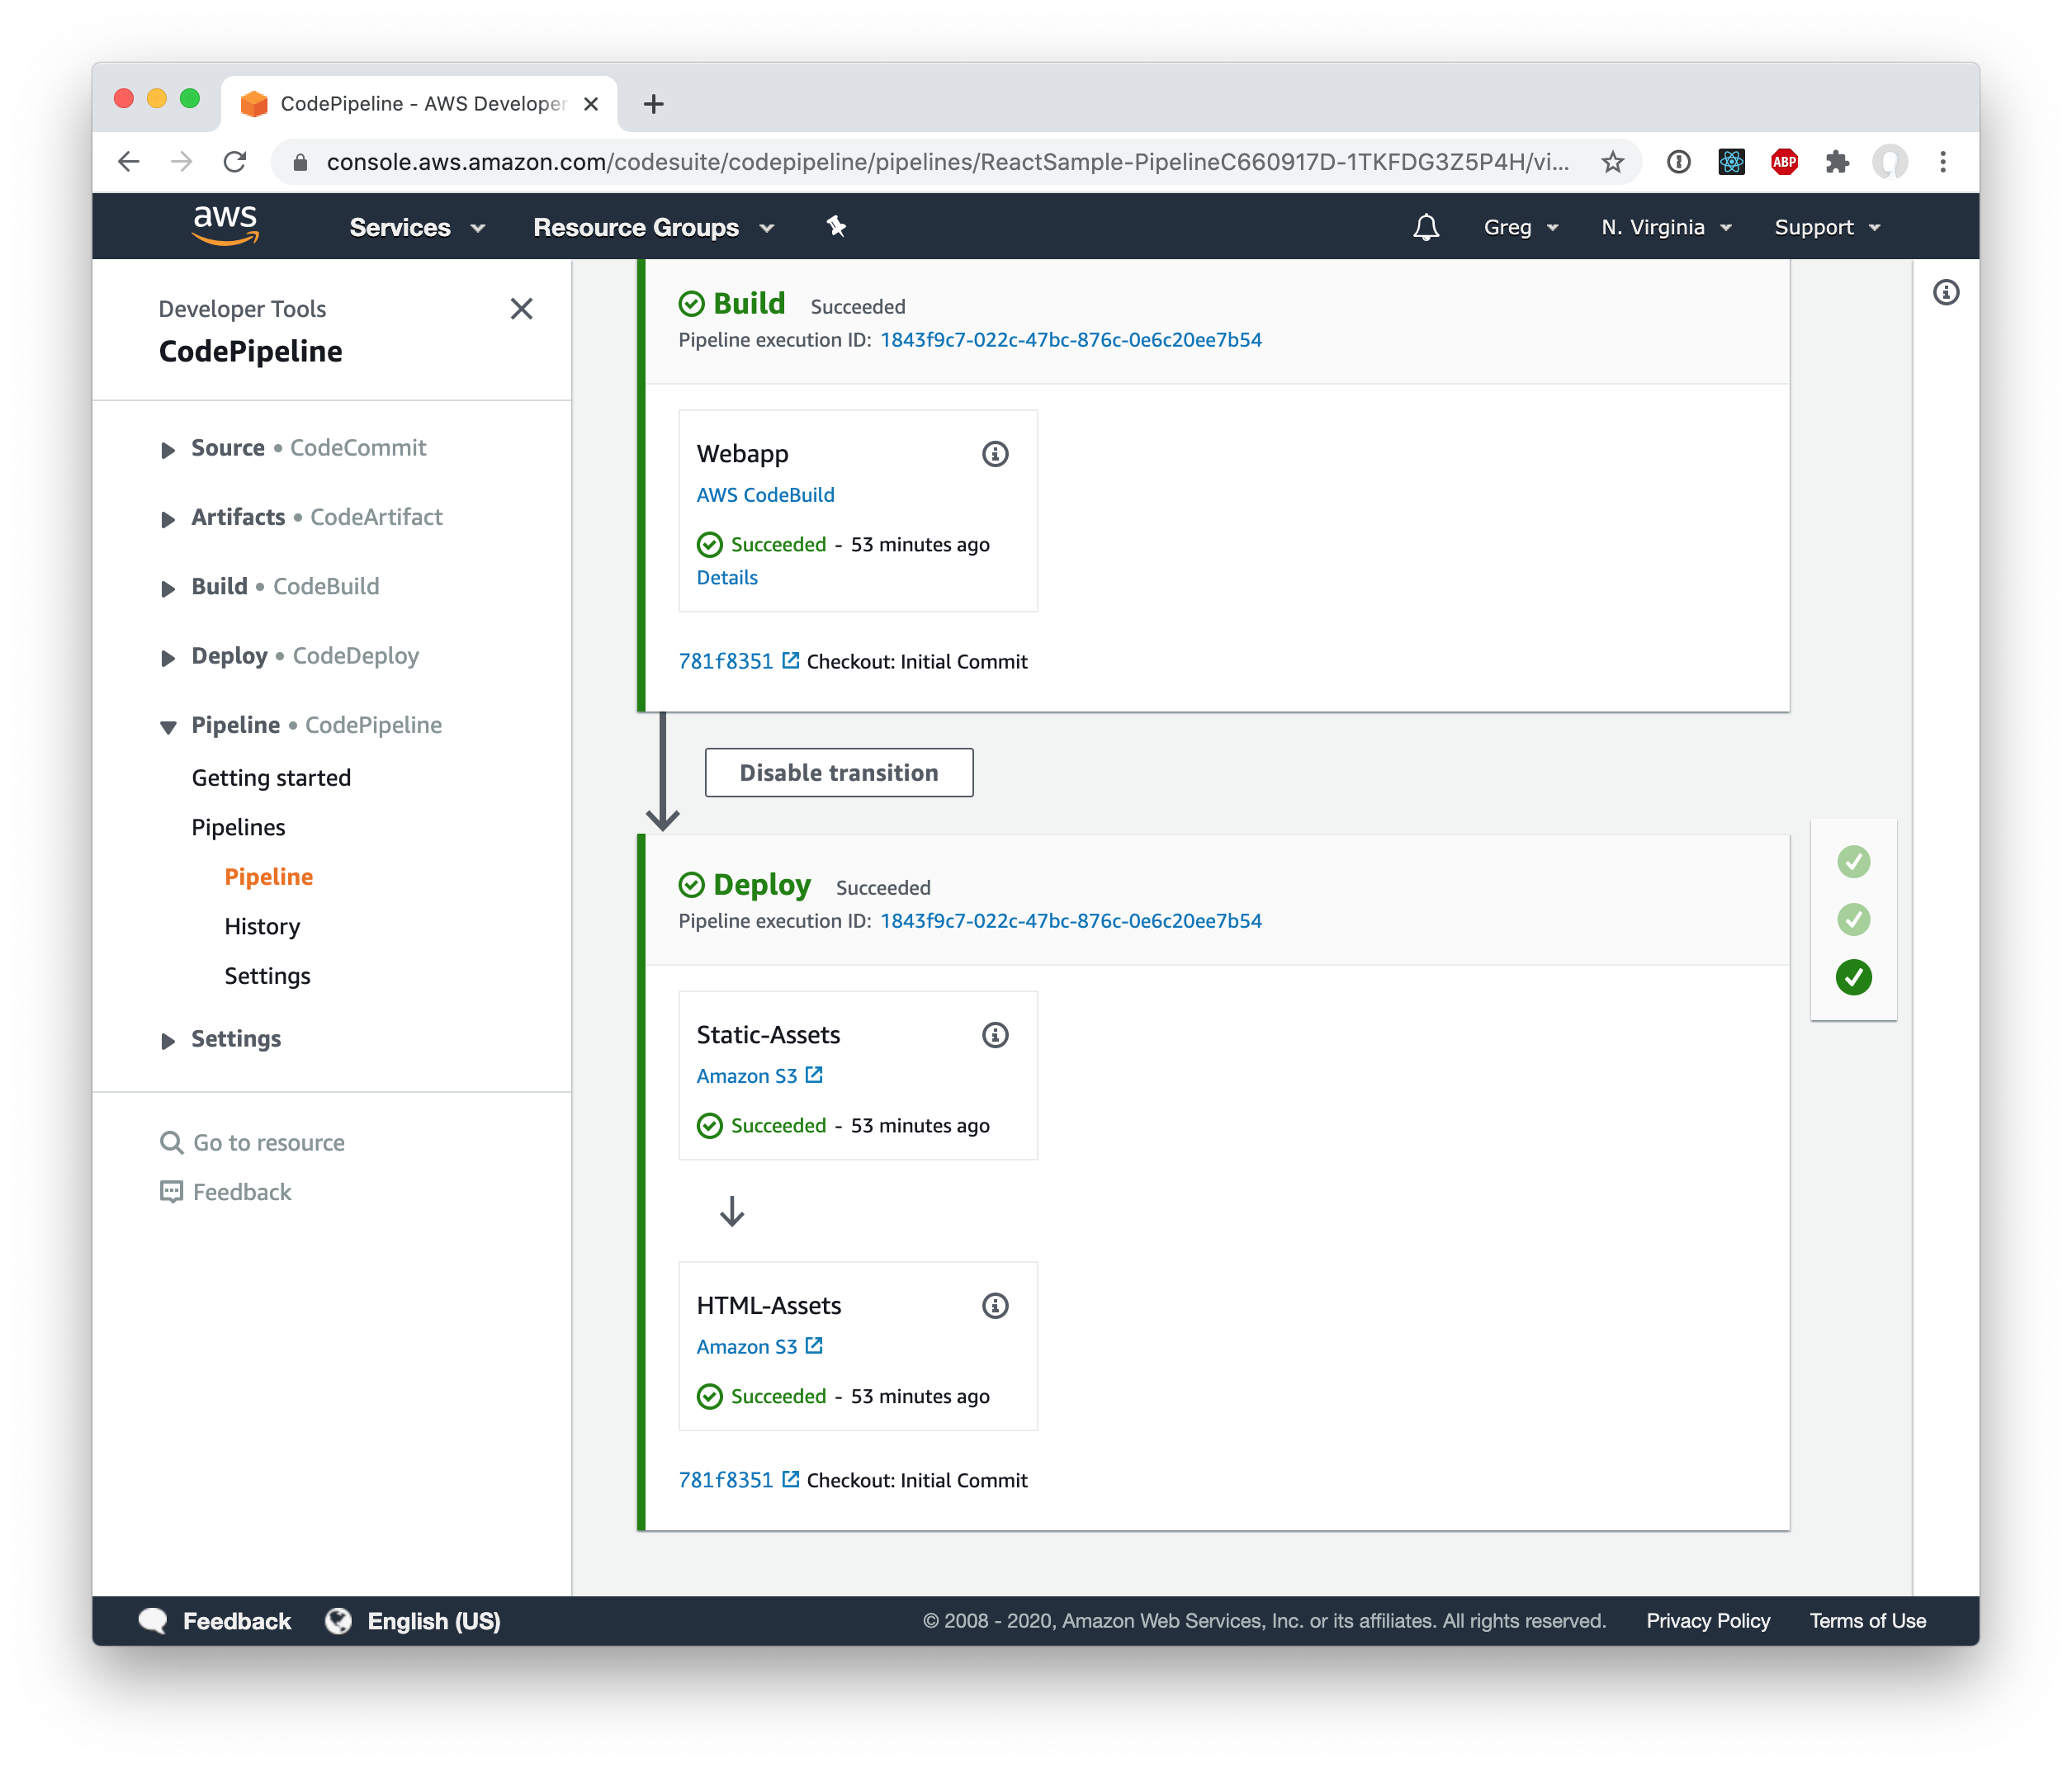
Finally, we need to deploy everything to S3 so that it can be served:
{
  stageName: 'Deploy',
  actions: [
    new S3DeployAction({
      actionName: 'Static-Assets',
      input: buildStaticOutput,
      bucket: webappBucket,
      cacheControl: [CacheControl.setPublic(), CacheControl.maxAge(Duration.days(1))],
      runOrder: 1
    }),
    new S3DeployAction({
      actionName: 'HTML-Assets',
      input: buildHtmlOutput,
      bucket: webappBucket,
      cacheControl: [CacheControl.noCache()],
      runOrder: 2
    })
  ]
}
This results in the cache-control header to public, max-age: 86400 for everything in the static directory and no-cache for the index.html. Not that I’m using runOrder to make sure that the assets get deployed before the HTML. That way, in case a user tries to load the site during a deploy (or worse, if an error occurs halfway through) they won’t get a broken experience from missing assets.
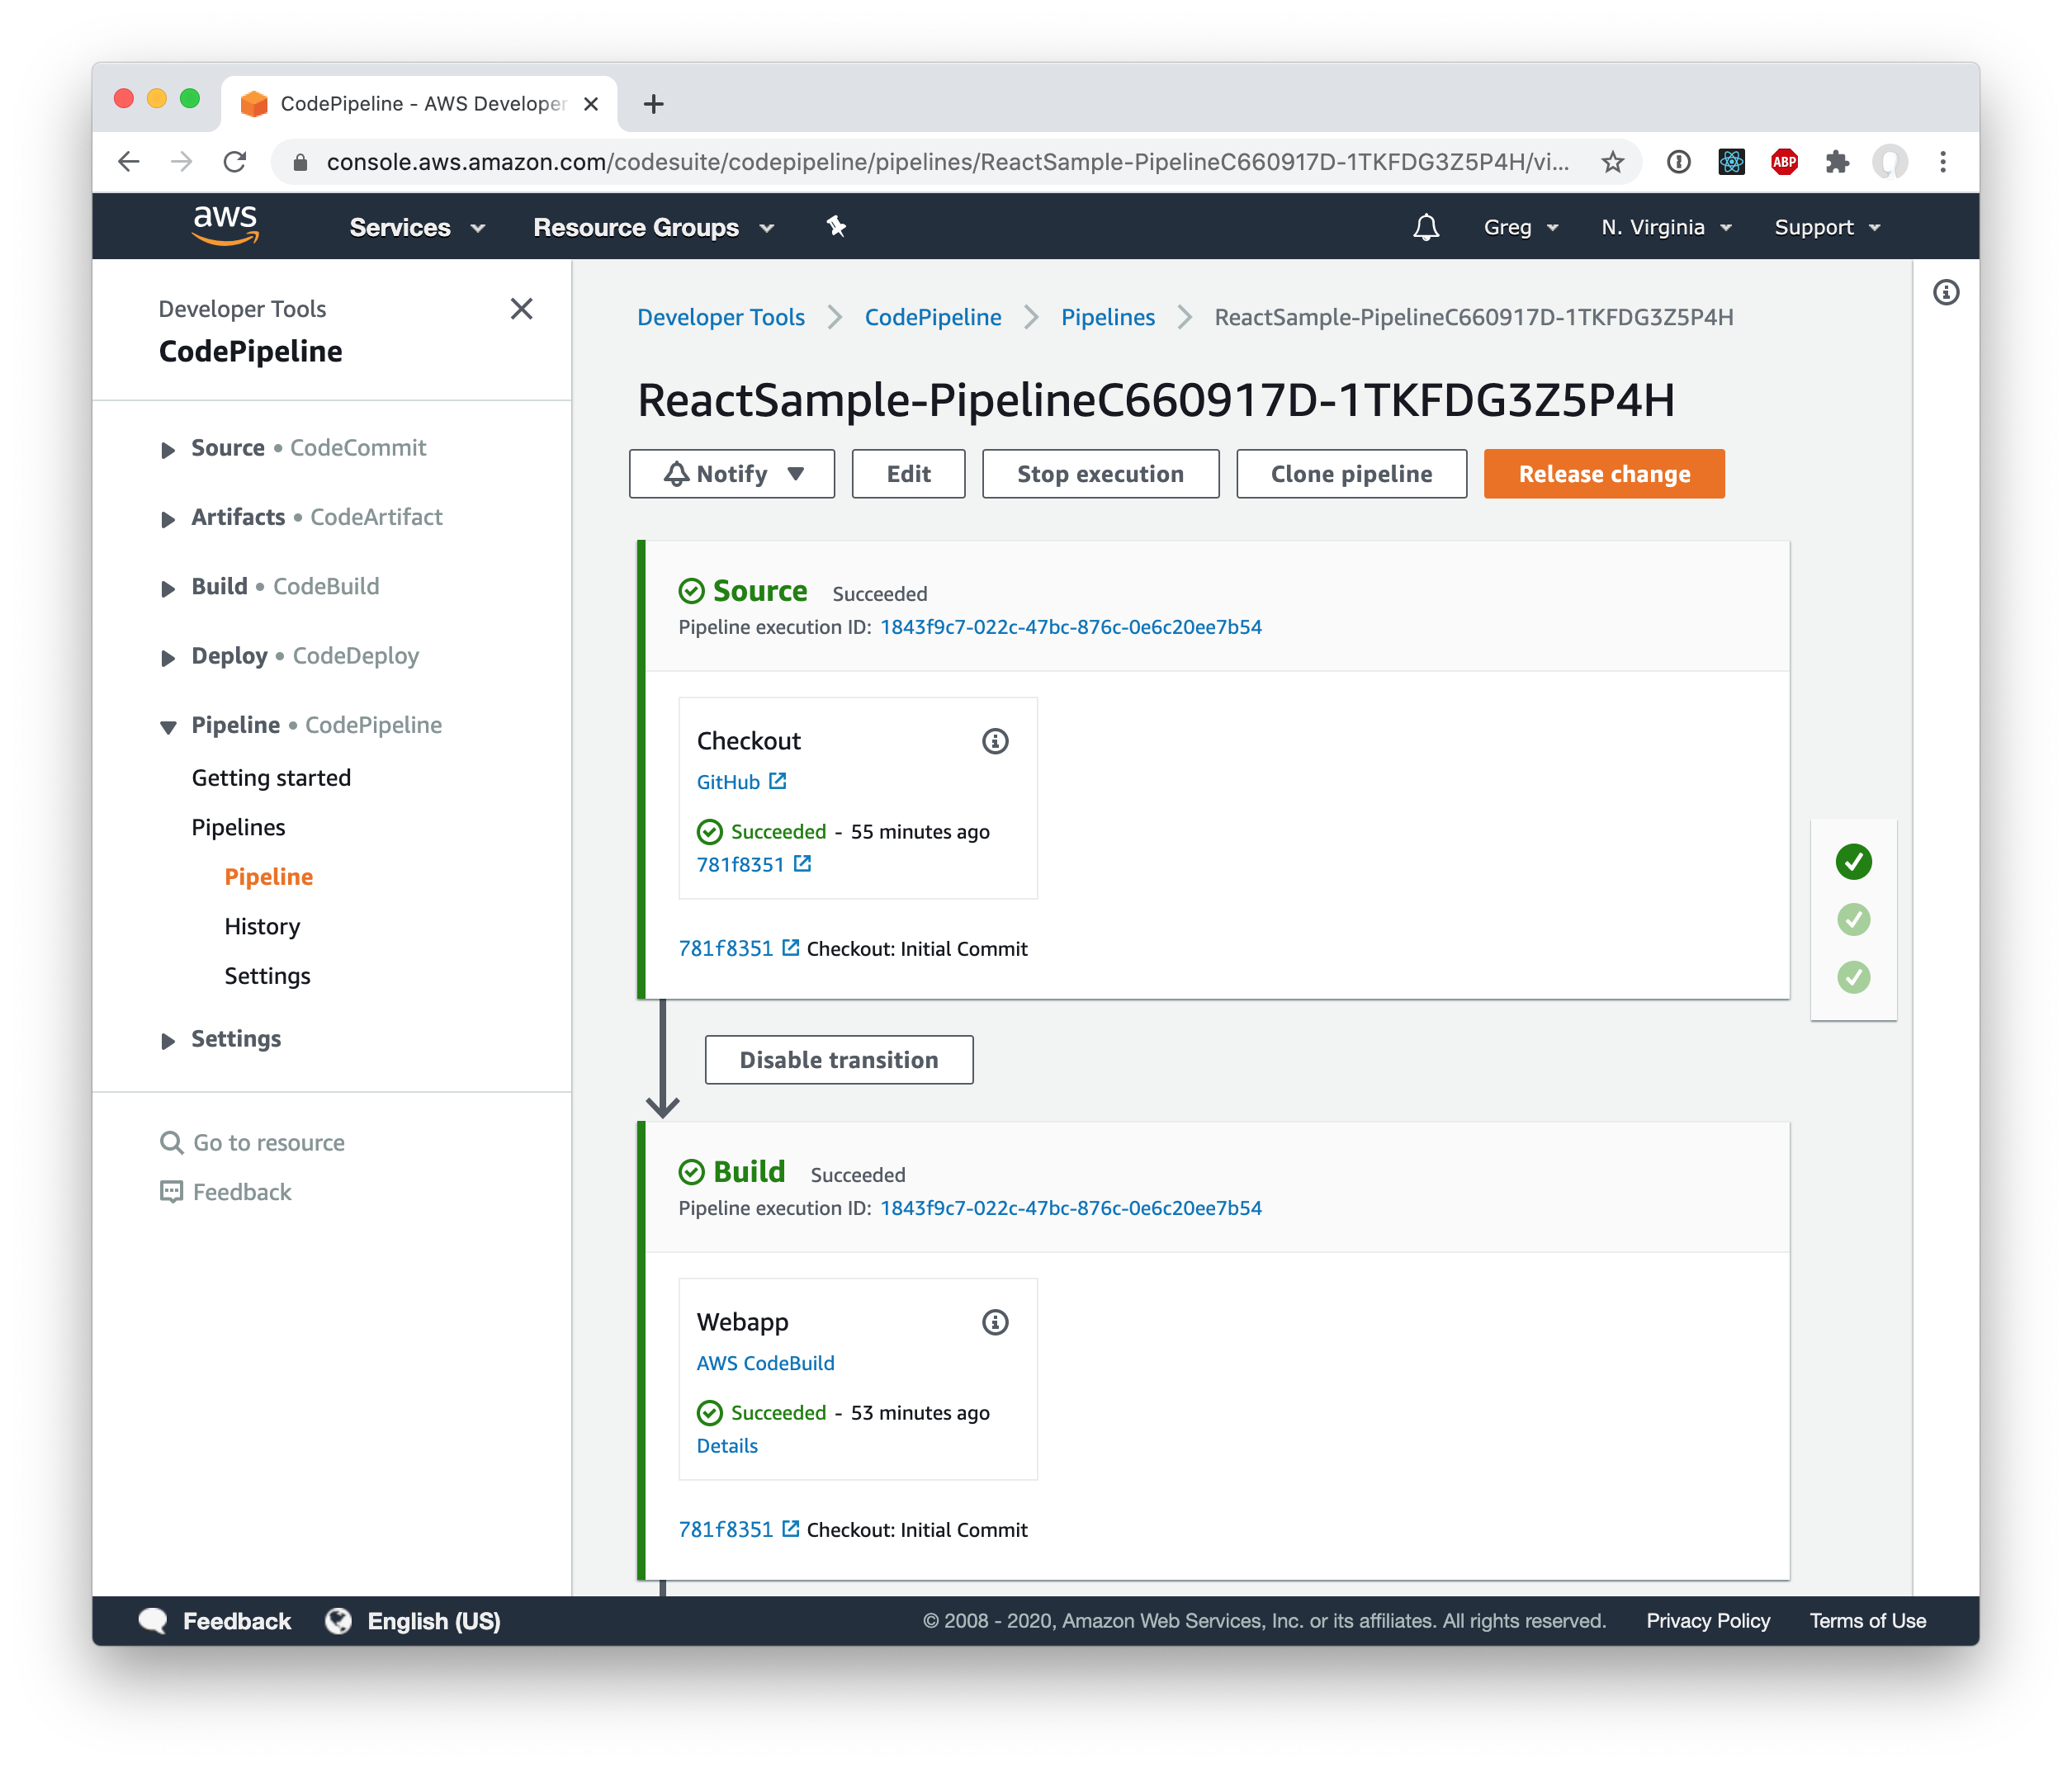
You can see the finished pipeline here:
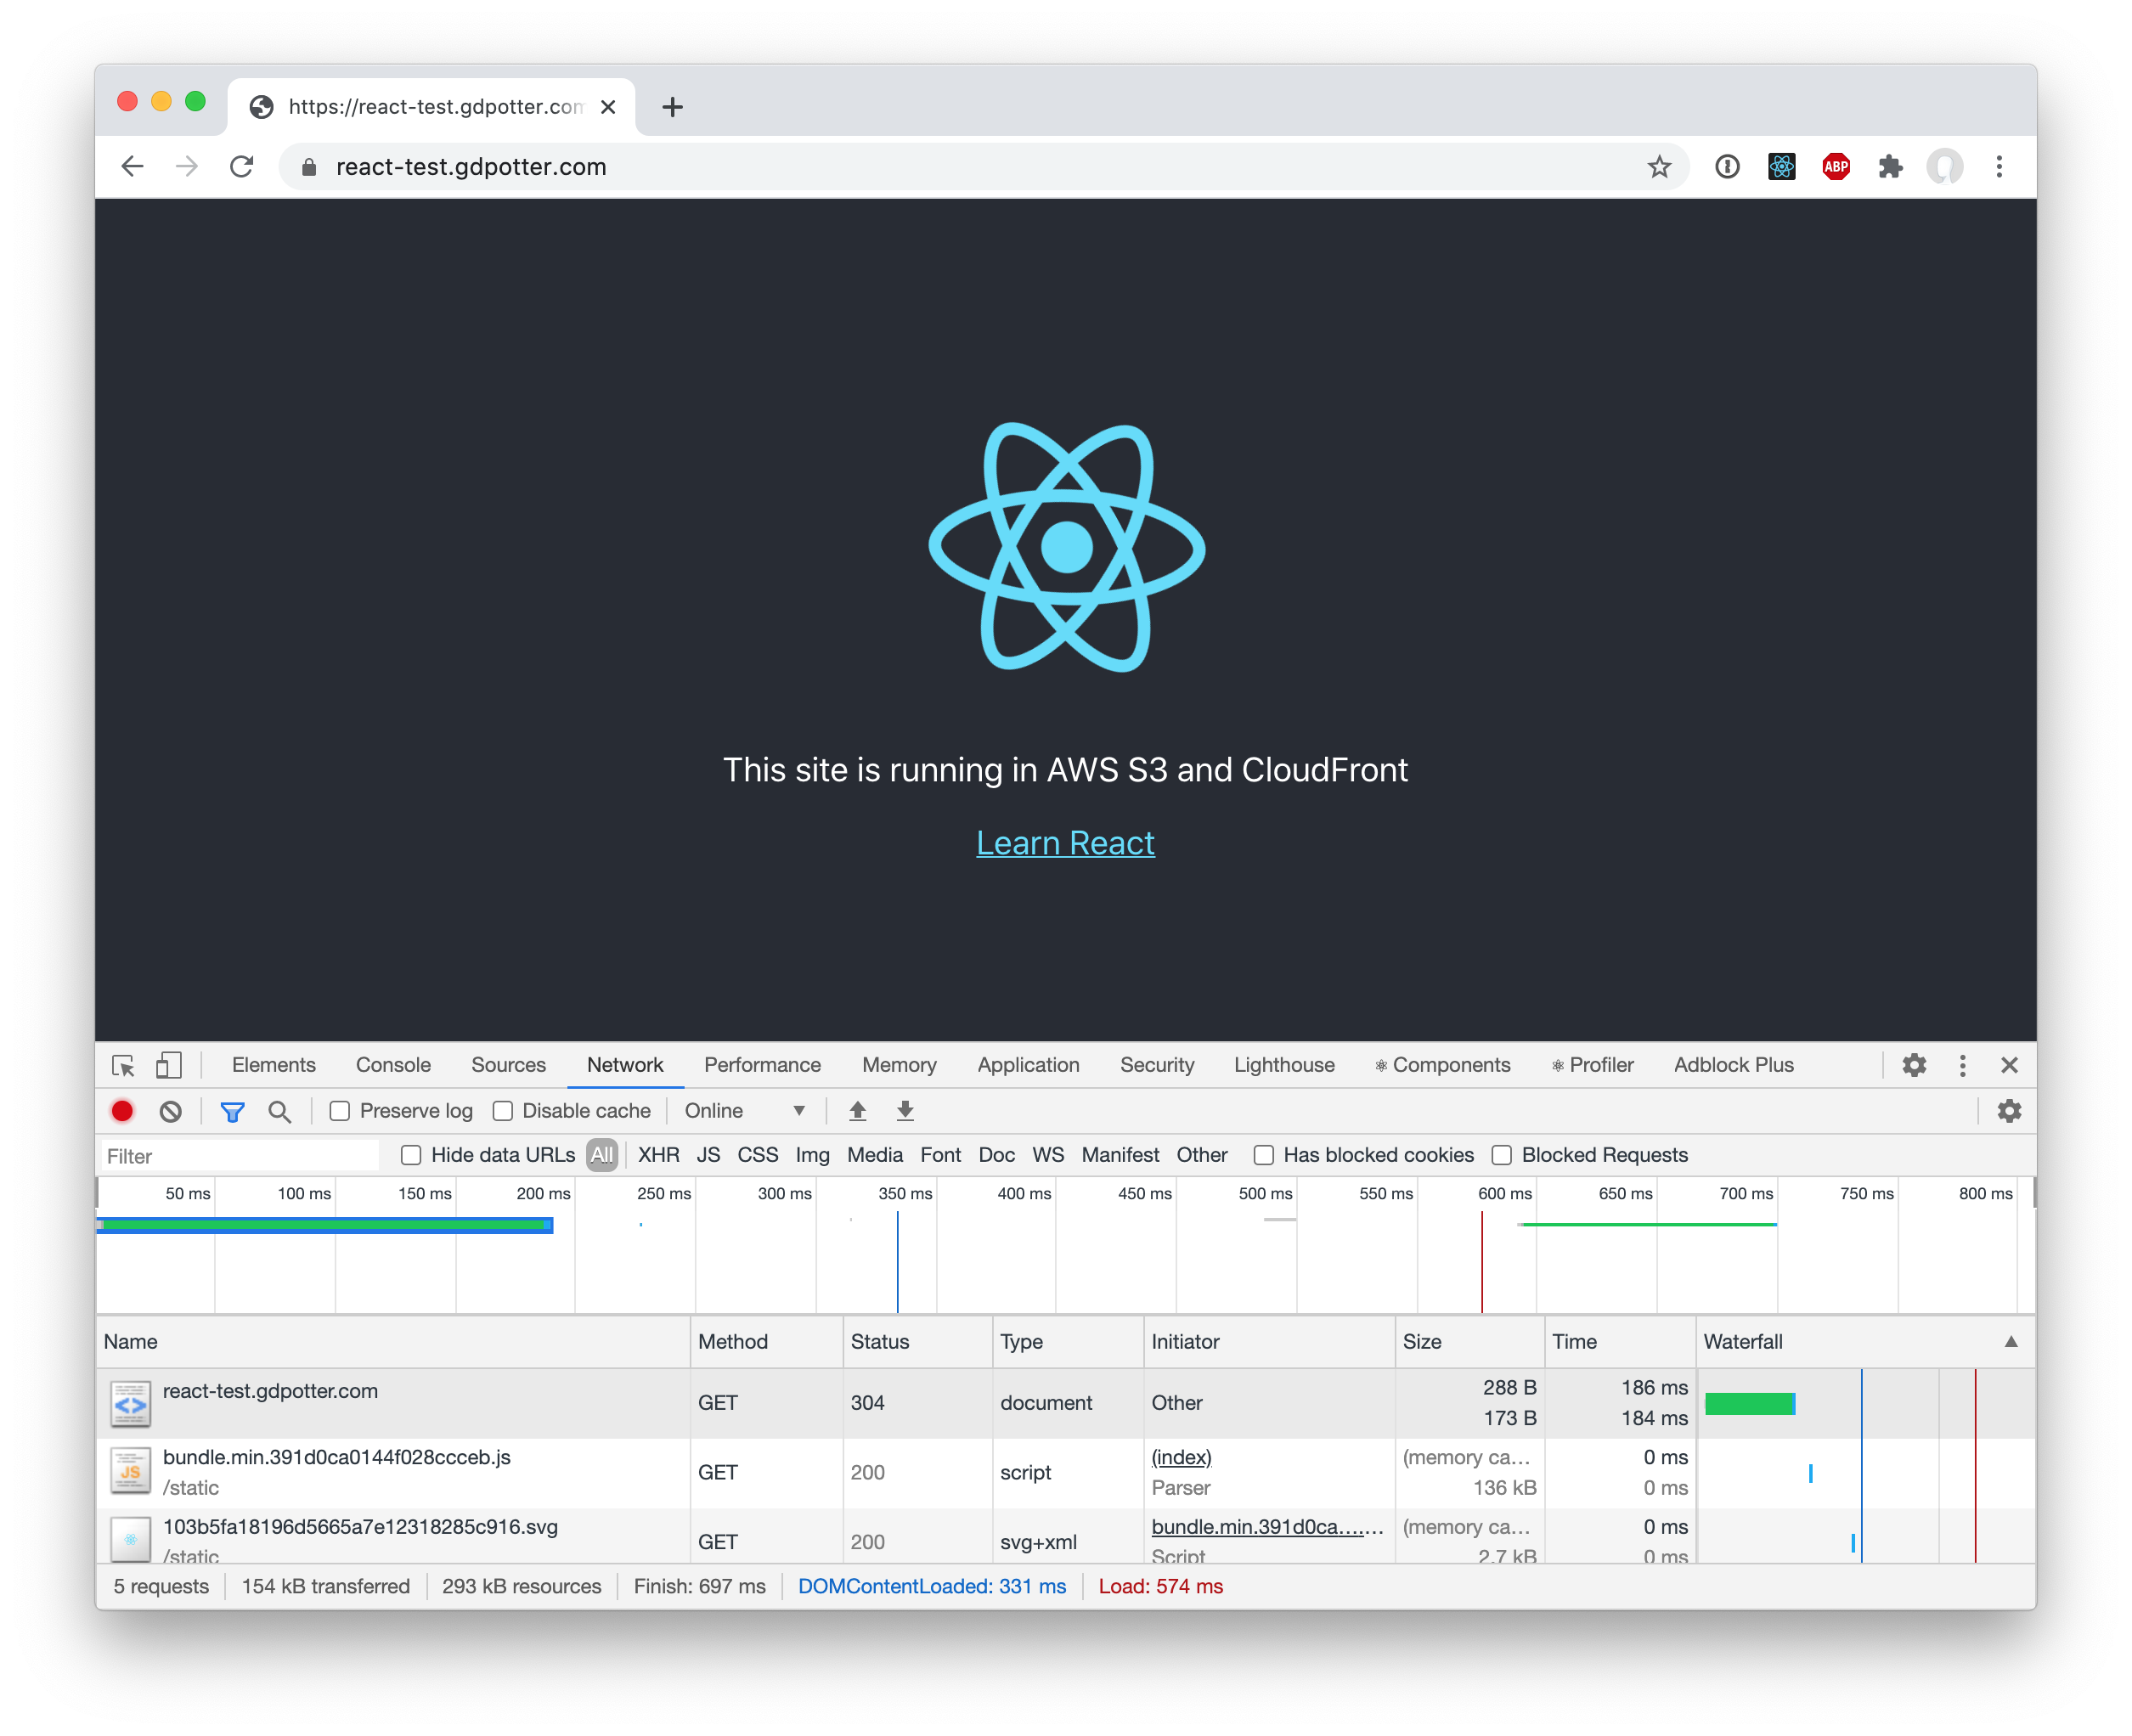
And if you load the site, you can see that subsequent loads will load the assets from the browser’s cache!
You can see the browse the final CDK Stack and web app on GitHub.
03 Nov 2018 -
Source -
Comments
It has been well documented that circular dependencies are an anti-pattern. It results in tight coupling and is a smell that your application might be utilizing the big ball of mud architecture. However, it is very rarely as simple as ClassA depends on ClassB and ClassB depends on ClassA. In medium-large Spring projects, these cycles might be 10+ beans in size and difficult to find.
Moving to constructor injection is seen as a best-practice for many reasons but one is that it doesn’t allow for circular dependencies to exist. In field/setter-injection, Spring can first construct all of the beans and then wire them up after. Constructor injection combines those two steps and requires all dependencies to already be instantiated before it can inject/create the bean. And while moving to constructor injection can be great for new projects, it doesn’t directly solve the problem of first identifying the circular dependencies in an existing application.
To find the cycles, first we need to identify all of the beans and their dependencies. That can be accomplished by iterating over all the bean definitions in the ListableBeanFactory:
public class DepGraph {
    private final Map<String, List<String>> nodes;

    private DepGraph(Map<String, Set<String>> nodes) {
        this.nodes = nodes;
    }

    public static DepGraph buildDependencyGraph(GenericApplicationContext applicationContext) {
        ListableBeanFactory factory = applicationContext.getBeanFactory();
        Map<String, Set<String>> beanDeps = Arrays.stream(factory.getBeanDefinitionNames())
            .filter(beanName -> !factory.getBeanDefinition(beanName).isAbstract())
            .collect(Collectors.toMap(
                Function.identity(),
                beanName -> Arrays.asList(factory.getDependenciesForBean(beanName))
            ));

        return new DepGraph(beanDeps);
    }
}
Next, we will perform a depth-first search of the graph. Is this the cleanest, most elegant DFS on the internet? No, but it worked for my use case. If anyone has any suggestions on how I can make stylish, please let me know in the comments below:
public Set<String> calculateCycles() {
    Set<String> visited =  new HashSet<>();
    return nodes.keySet().stream()
        .map(node -> calculateCycles(node, visited, Collections.emptyList()))
        .flatMap(Set::stream)
        .collect(Collectors.toSet());
}

private Set<String> calculateCycles(String node, Set<String> visited, List<String> path) {
    if (visited.contains(node)) {
        return Collections.emptySet();
    }

    List<String> newPath = new LinkedList<>(path);
    newPath.add(node);
    visited.add(node);

    if (path.contains(node)) {
        List<String> cycle = newPath.subList(path.indexOf(node), path.size());
        return Collections.singleton(String.join("->", cycle));
    }
    List<String> deps = nodes.getOrDefault(node, Collections.emptyList());
    return deps.stream()
        .map(dep -> calculateCycles(dep, visited, newPath))
        .flatMap(Set::stream)
        .collect(Collectors.toSet());
}
We begin by creating a HashSet to keep track of all the bean names that have been already visited in the search. Since the graph likely has cycles, we wouldn’t want to get stuck in an endless loop. We then begin iterating through the map invoking the next method for each entry. For each entry, we recursively explore all of its dependencies while keeping track of the path we took to get there. If the new node is already in that path, then we have found a cycle.
I’m just returning a collection of String (ie "A->B->C->D->A") but you can adapt that to return a List or real class depending on your use case case.
I found this to be very helpful in identifying problematic portions of my codebase. My team is slowly working on untangling this web of beans
and working to avoid these in the future.
21 Sep 2017 -
Source -
Comments
When we left off on our Gradle JAXB project, we were using a simple Gradle configuration to generate Java classes from an XML schema using JAXB and XJC. However, once you start to use the generated classes, you will notice something about date fields that might be difficult to use. Once again, we are using the ISO 20022 schemas in the sample.
If you don’t want to follow the entire tutorial, you can jump right to the complete code on GitHub.
Before we begin, let’s take a look at the issue. Notice the FinancialInstrumentAttributes79 class:
public class FinancialInstrumentAttributes79 {

  @XmlElement(name = "FinInstrmId", required = true)
  protected SecurityIdentification19 finInstrmId;
  @XmlElement(name = "PlcOfListg")
  protected MarketIdentification3Choice plcOfListg;
  @XmlElement(name = "DayCntBsis")
  protected InterestComputationMethodFormat4Choice dayCntBsis;
  @XmlElement(name = "ClssfctnTp")
  protected ClassificationType32Choice clssfctnTp;
  @XmlElement(name = "OptnStyle")
  protected OptionStyle8Choice optnStyle;
  @XmlElement(name = "DnmtnCcy")
  protected String dnmtnCcy;
  @XmlElement(name = "NxtCpnDt")
  protected XMLGregorianCalendar nxtCpnDt;
  @XmlElement(name = "XpryDt")
  protected XMLGregorianCalendar xpryDt;
  @XmlElement(name = "FltgRateFxgDt")
  protected XMLGregorianCalendar fltgRateFxgDt;
  @XmlElement(name = "MtrtyDt")
  protected XMLGregorianCalendar mtrtyDt;
  @XmlElement(name = "IsseDt")
  protected XMLGregorianCalendar isseDt;

  ...

}
While some of those fields use simple strings, the default XMLGregorianCalendar class is not the easiest to work with. Some of these fields do not even store time information and would be much better suited with the Java 8 LocalDate class. Luckily, with a bit of xml configuration in the bindings file, we can tell XJC to use type adapters for Java 8’s Date and Time API (aka JSR-310).
Getting Started
At its core, JAXB uses the XmlAdapter<ValueType,BoundType> class to convert between the XML string and the Java class. We could extend this class ourselves but I found an open source project jaxb-java-time-adapters that did the job quite well. To start, we will need to add this dependency to gradle so that jaxb can use the classes:
dependencies {
  compile(files(genJaxb.classesDir).builtBy(genJaxb))
  jaxb "com.sun.xml.bind:jaxb-xjc:2.1.7"
  jaxb "com.migesok:jaxb-java-time-adapters:1.1.3"
}
Next, we will need to add the xjc namespace to the top of the binding.xml file:
<bindings xmlns="http://java.sun.com/xml/ns/jaxb" version="2.1"
          xmlns:xjc="http://java.sun.com/xml/ns/jaxb/xjc">
  ...
</bindings>
However, you’re not done yet. If you were to try to run gradle clean genJaxb right now, you would see an error similar to the following:
[ant:xjc] [ERROR] vendor extension bindings (jaxb:extensionBindingPrefixes) are not allowed in the strict mode. Use -extension.
The error is pretty self-explanatory but it can be difficult to act on if you don’t know where to look. We just need to add one simple line to the xjc ant configuration in the build.gradle file:
xjc(destdir: sourcesDir, binding: "${projectDir}/src/main/resources/binding.xml") {
  schema(dir: "${projectDir}/src/main/resources", includes: '**/*.xsd')
  arg(value: "-extension")
  produces(dir: sourcesDir, includes: '**/*.java')
}
Adding the Type Adapter
After adding the dependency and enabling extension bindings, we can configure our new type adapters. Just add the following to the top of the binding.xml file:
<bindings xmlns="http://java.sun.com/xml/ns/jaxb" version="2.1"
          xmlns:xjc="http://java.sun.com/xml/ns/jaxb/xjc">

  <globalBindings>
    <xjc:javaType name="java.time.LocalDate" xmlType="xs:date"
      adapter="com.migesok.jaxb.adapter.javatime.LocalDateXmlAdapter" />
    <xjc:javaType name="java.time.LocalDateTime" xmlType="xs:dateTime"
      adapter="com.migesok.jaxb.adapter.javatime.LocalDateTimeXmlAdapter" />
  </globalBindings>

  ...

</bindings>
We’re just going to configure the adapters for LocalDate and LocalDateTime (binding them to the xs:date and xs:dateTime XML types) but you can add as many as you would like.
Result
Now let’s look back at that same FinancialInstrumentAttributes79 class from above:
public class FinancialInstrumentAttributes79 {

  @XmlElement(name = "FinInstrmId", required = true)
  protected SecurityIdentification19 finInstrmId;
  @XmlElement(name = "PlcOfListg")
  protected MarketIdentification3Choice plcOfListg;
  @XmlElement(name = "DayCntBsis")
  protected InterestComputationMethodFormat4Choice dayCntBsis;
  @XmlElement(name = "ClssfctnTp")
  protected ClassificationType32Choice clssfctnTp;
  @XmlElement(name = "OptnStyle")
  protected OptionStyle8Choice optnStyle;
  @XmlElement(name = "DnmtnCcy")
  protected String dnmtnCcy;
  @XmlElement(name = "NxtCpnDt", type = String.class)
  @XmlJavaTypeAdapter(LocalDateXmlAdapter.class)
  protected LocalDate nxtCpnDt;
  @XmlElement(name = "XpryDt", type = String.class)
  @XmlJavaTypeAdapter(LocalDateXmlAdapter.class)
  protected LocalDate xpryDt;
  @XmlElement(name = "FltgRateFxgDt", type = String.class)
  @XmlJavaTypeAdapter(LocalDateXmlAdapter.class)
  protected LocalDate fltgRateFxgDt;
  @XmlElement(name = "MtrtyDt", type = String.class)
  @XmlJavaTypeAdapter(LocalDateXmlAdapter.class)
  protected LocalDate mtrtyDt;
  @XmlElement(name = "IsseDt", type = String.class)
  @XmlJavaTypeAdapter(LocalDateXmlAdapter.class)
  protected LocalDate isseDt;

  ...

}
Now the generated classes are using LocalDate instead of XMLGregorianCalendar for these dates. Notice the @XMLJavaType annotation on the field–that is how the JAXB marshaller knows how to marshal and unmarshal the XML and these generated classes.
14 Aug 2017 -
Source -
Comments
Working with any XML schema is often a daunting task and when using Java it is common to use a library such as JAXB to turn that schema into Java classes and then marshal (or unmarshal) the XML using those classes. The XJC tool will convert XML schemas into the Java classes but unfortunately due to the age of the project, integrating with gradle is not clear. However, there is an Ant plugin that we can invoke from Gradle to make generating these classes easy.
Because this is just a Gradle task, it can be included in any project. However, I’ve found placing the generated classes in its own jar to work well on any medium to large project. This way, the classes don’t have to be constantly regenerated each time gradle clean is run and it allows any consumers to be consistently versioned to the correct schema.
For this example, we will be using the ISO 20022 schemas to generate Java classes. These schemas are especially complex with a single XSD file including hundreds of classes.
If you don’t want to follow the entire tutorial, you can jump right to the complete code on GitHub.
Getting Started
To get started, we are going to want to add the jaxb dependency and a basic task with our details:
configurations {
    jaxb
}
dependencies {
    jaxb "com.sun.xml.bind:jaxb-xjc:2.1.7"
}
task genJaxb {
  ext.sourcesDir = "${buildDir}/generated-sources/jaxb"
  ext.classesDir = "${buildDir}/classes/jaxb"
  outputs.dir classesDir
}
Working with a Single Schema
We want configure the genJaxb task to generate the classes:
task genJaxb {
  ext.sourcesDir = "${buildDir}/generated-sources/jaxb"
  ext.classesDir = "${buildDir}/classes/jaxb"
  ext.schema = "${projectDir}/src/main/resources/seev.031.001.07.xsd"
  outputs.dir classesDir

  doLast() {
    project.ant {
      // Create output directories
      mkdir(dir: sourcesDir)
      mkdir(dir: classesDir)

      taskdef name: 'xjc', classname: 'com.sun.tools.xjc.XJCTask', classpath: configurations.jaxb.asPath

      xjc(destdir: sourcesDir, schema: schema, 'package': 'com.gdpotter.sample.iso_20022.seev_031_01_07') {
        produces(dir: sourcesDir, includes: '**/*.java')
      }

      javac(destdir: classesDir, source: 1.8, target: 1.8, debug: true,
            debugLevel: 'lines,vars,source',
            includeantruntime: false,
            classpath: configurations.jaxb.asPath) {
        src(path: sourcesDir)
        include(name: '**/*.java')
        include(name: '*.java')
      }

      copy(todir: classesDir) {
        fileset(dir: sourcesDir, erroronmissingdir: false) {
          exclude(name: '**/*.java')
        }
      }
    }
  }
}
In this example, I’ve placed the schema xsd file in src/main/resources but you could have also pointed it to an online address.
Finally, we just need to make sure that the compiled sources are included in the jar and can referenced by the code. We do this by adding the classesDir to the jar task and also including them as a dependency:
dependencies {
  compile(files(genJaxb.classesDir).builtBy(genJaxb))
  jaxb 'com.sun.xml.bind:jaxb-xjc:2.1.7'
}

compileJava.dependsOn 'genJaxb'

jar {
  from genJaxb.classesDir
}
To generate the classes, you can run the jar task which depends on genJaxb:
You can see the results in the /build/ directory:
├── build
│   ├── classes
│   │   └── jaxb
│   │       └── (compiled .class files)
│   ├── generated-sources
│   │   └── jaxb
│   │       └── (generated .java files)
│   ├── libs
│   │   └── gradle-jaxb-example-1.0-SNAPSHOT.jar
...
Adding Multiple Schemas
Let’s now take a look at what we would need to do add multiple schemas. We have the seev_031 schema added above, but let’s add the seev_039 schema as well and just change it to load all *.xsd files:
xjc(destdir: sourcesDir, 'package': 'com.gdpotter.sample.iso_20022') {
  schema(dir: "${projectDir}/src/main/resources", includes: '**/*.xsd')
  produces(dir: sourcesDir, includes: '**/*.java')
}
However, when trying to run the genJaxb Gradle task, we get an errors like the following:
[ant:xjc] [ERROR] A class/interface with the same name "com.gdpotter.sample.iso_20022.seev_031_01_07.EventConfirmationStatus1Code" is already in use. Use a class customization to resolve this conflict.
This is because the two xsd files declare some of the same classes. You’ll also notice that both schemas have to be configured for the same package. Even though we can configure multiple schemas, we can only configure a single package. However, by using a binding.xml file, we are able to customize the package of each schema.
The binding.xml file
The binding file allows for the customization how how the jaxb binding process occurs. We are going to use it to change the package on a per-schema basis as follows:
<bindings xmlns="http://java.sun.com/xml/ns/jaxb" version="2.1">
  <bindings schemaLocation="seev.031.001.07.xsd">
    <schemaBindings>
      <package name="com.gdpotter.sample.iso_20022.seev_031_01_07" />
    </schemaBindings>
  </bindings>
  <bindings schemaLocation="seev.039.001.07.xsd">
    <schemaBindings>
      <package name="com.gdpotter.sample.iso_20022.seev_039_01_07" />
    </schemaBindings>
  </bindings>
</bindings>
And then we can just configure our genJaxb task to use that file:
xjc(destdir: sourcesDir, binding: "${projectDir}/src/main/resources/binding.xml") {
  schema(dir: "${projectDir}/src/main/resources", includes: '**/*.xsd')
  produces(dir: sourcesDir, includes: '**/*.java')
}