The Complete Guide to React Hosting on AWS S3/CloudFront
01 Jul 2020 - Source - CommentsStatic/serverless website hosting is really cool. The economics and maintenance requirements are highly attractive (no paying for or managing servers) and the scalability is practically endless. Although there are many web hosts out there, I like hosting in S3 for the ease of maintenance, near-infinite scalability, and incredibly low cost. However, getting things set up just right can be challenging.
This (somewhat opinionated) guide walks through the steps of setting up a webpack react app to deploy to AWS S3/CloudFront using CodePipeline and CodeBuild when changes are pushed to the GitHub repo. And most of this will be set up using the AWS CDK (holy buzzwords!) This process is slightly adapted from what I am using in production to deploy the front-end of a Sudoku app I build called Supradoku.
Although S3 and CloudFront have incredibly low prices (compared to traditional hosting), we are going to want to make sure that we maximize our caching opportunities.
Here’s what we’ll cover:
- Configuring webpack to output the static assets
- Getting started with a CDK project
- Using the CDK to configure a bucket/CloudFront distribution for hosting
- Build a pipeline for CI/CD
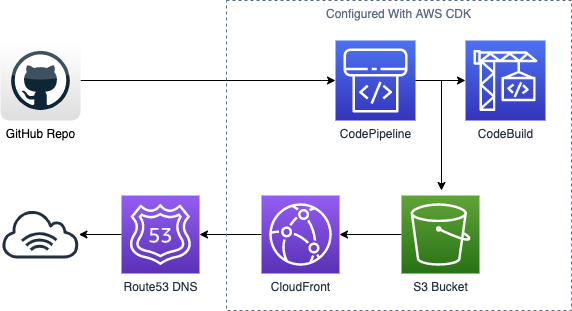
And here’s a diagram of how all the pieces fit together:
Before getting started, I assume you have the following:
- A GitHub account and repo set up for your react app
- An AWS account and a basic understanding of S3/CloudFront/Route53
- A domain name and hosted zone in Route53
- A bit of experience with webpack
- Knowledge of TypeScript (you could do this with plain JavaScript but that’s kinda lame)
- You’ve installed and configured the AWS CDK. If you haven’t done that yet, follow these steps
Setting up the project
The code for this project is broken up into two pieces: the source and the CDK project. If you haven’t already, go ahead and create a new GitHub project for the webpack project. I’ve hosted mine at https://github.com/gdpotter/webpack-react-sample.
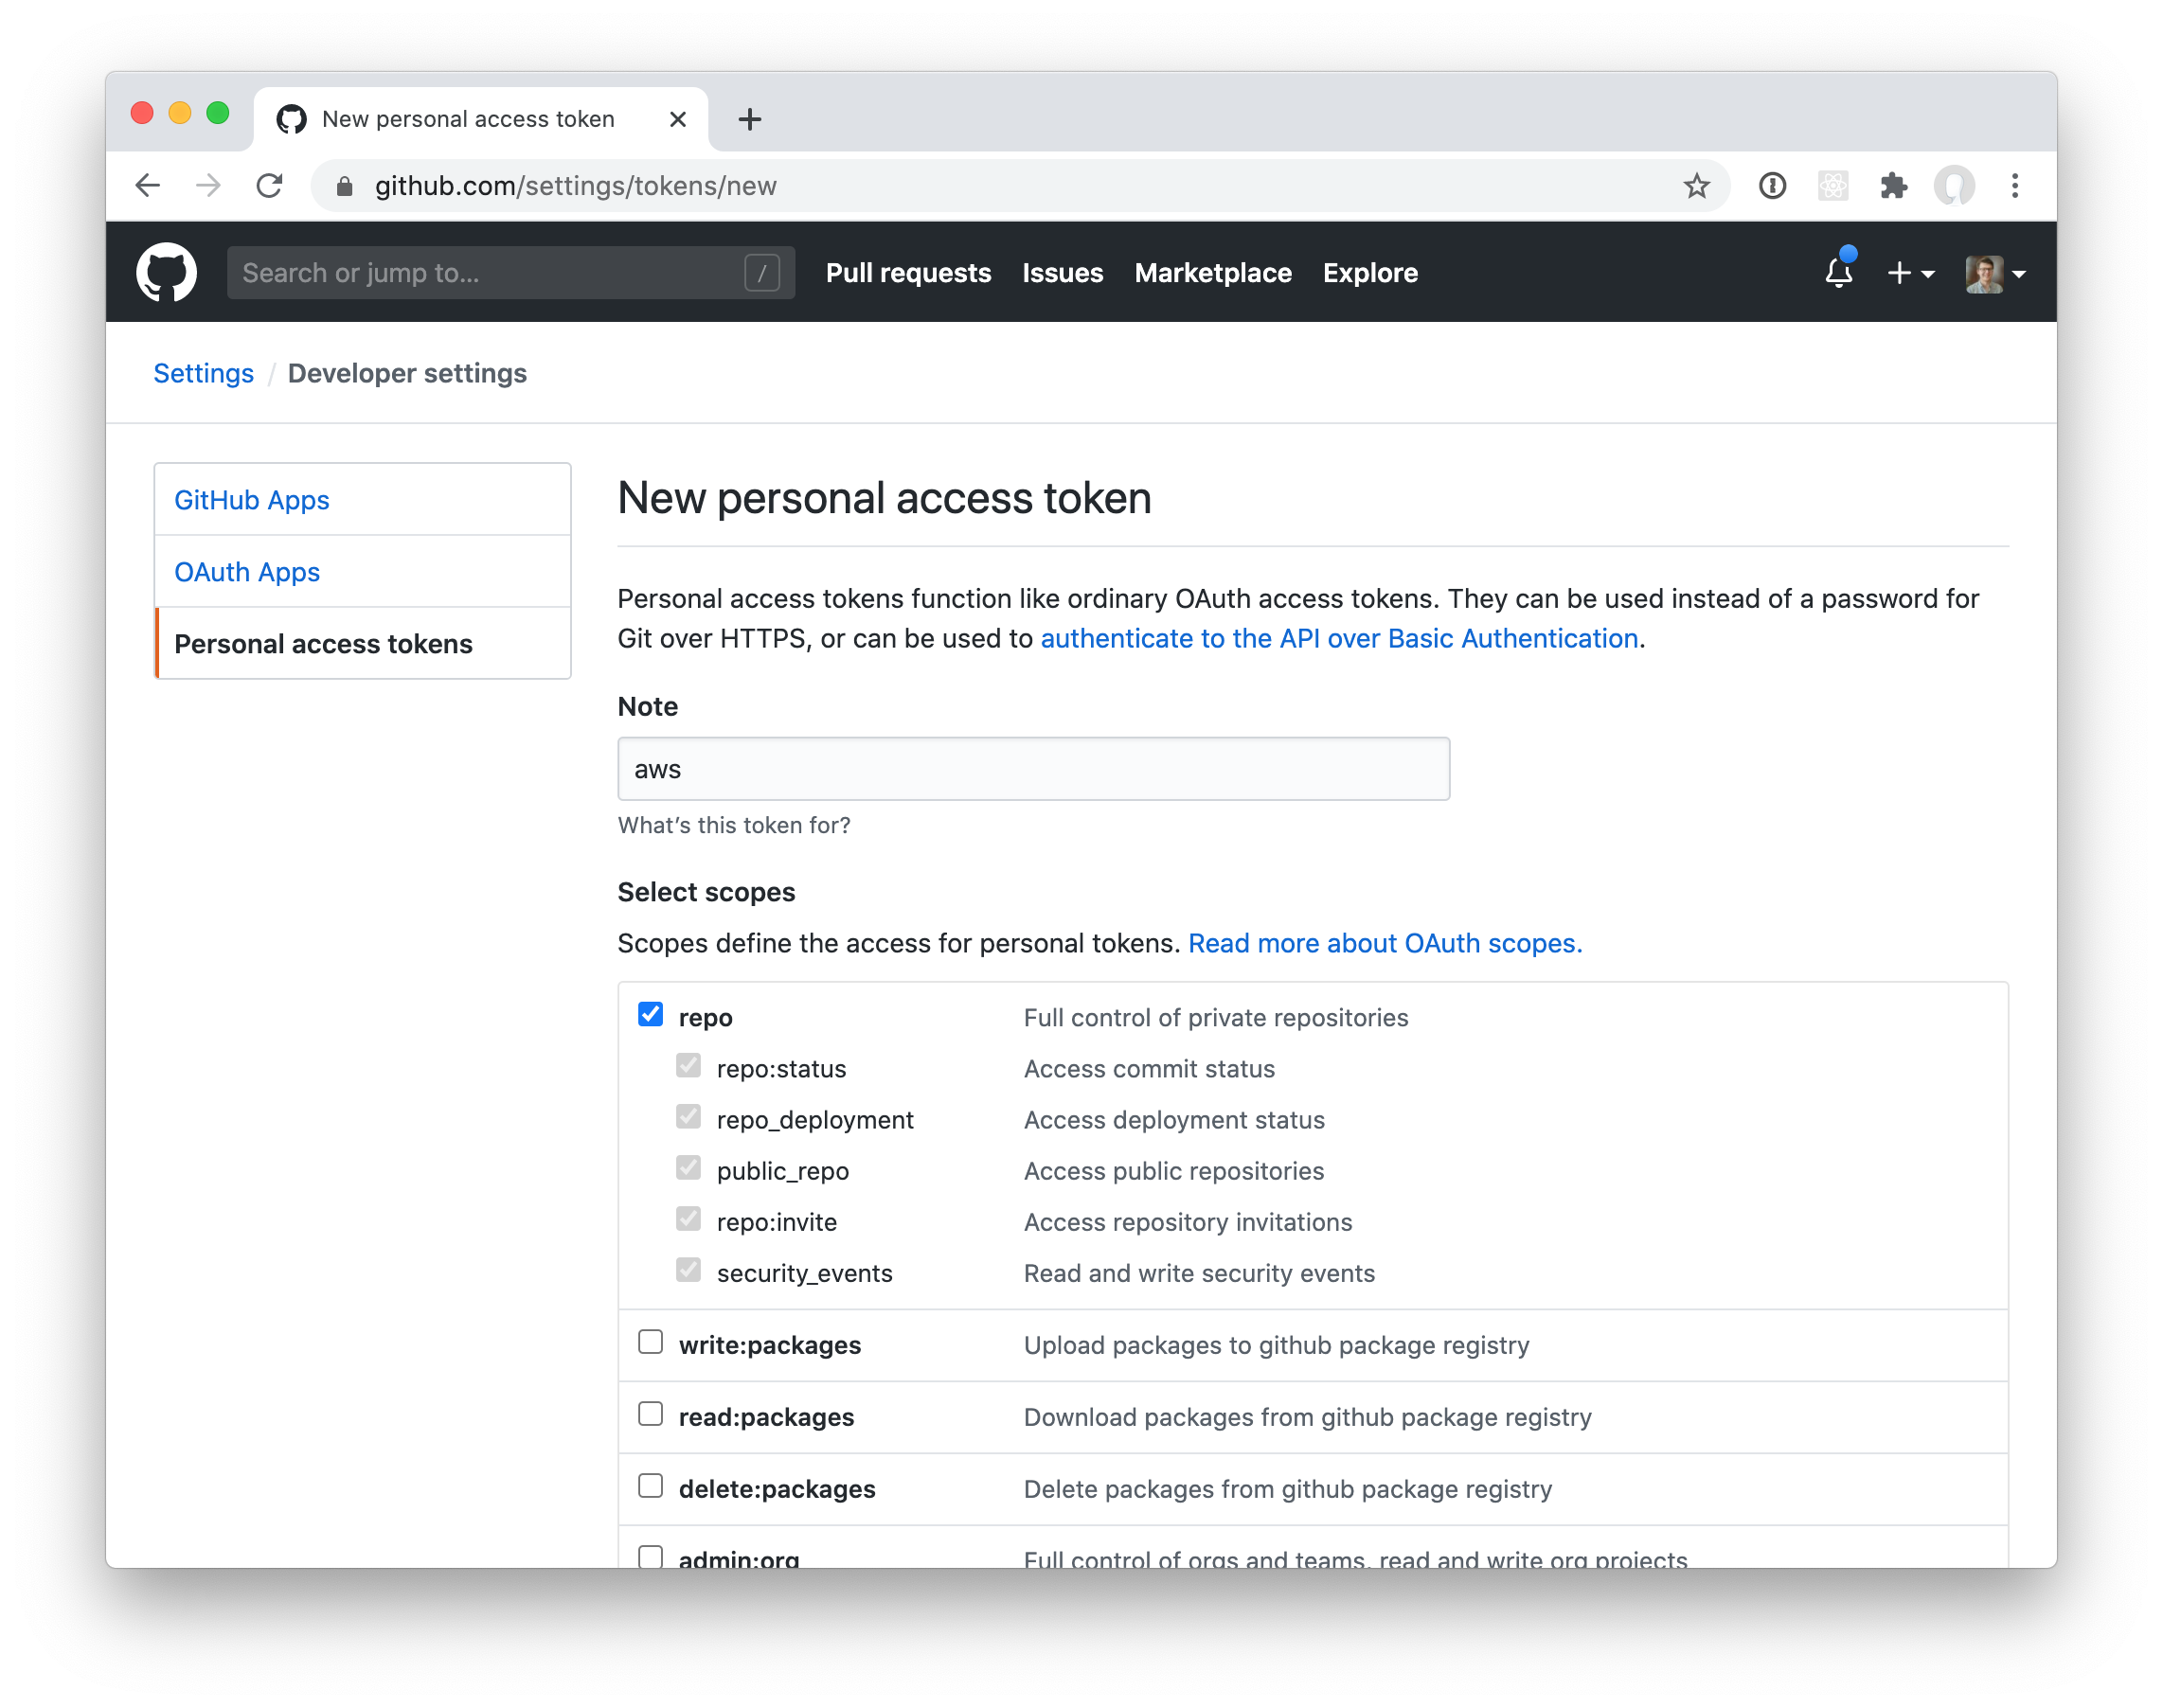
In order for CodePipeline to access the repository and register the webhook trigger, you’ll need to create a Personal Access Token. You can generate a token in the GitHub UI by going to Settings -> Developer Settings -> Personal access tokens. Be sure to select the repo scope:
Of course, this token is very sensitive and it would be a terrible idea to store it in plain text in the CDK stack. Instead, we will store it in AWS Secrets Manager. Go ahead and choose “Other type of secrets” and just drop the key in as plaintext.
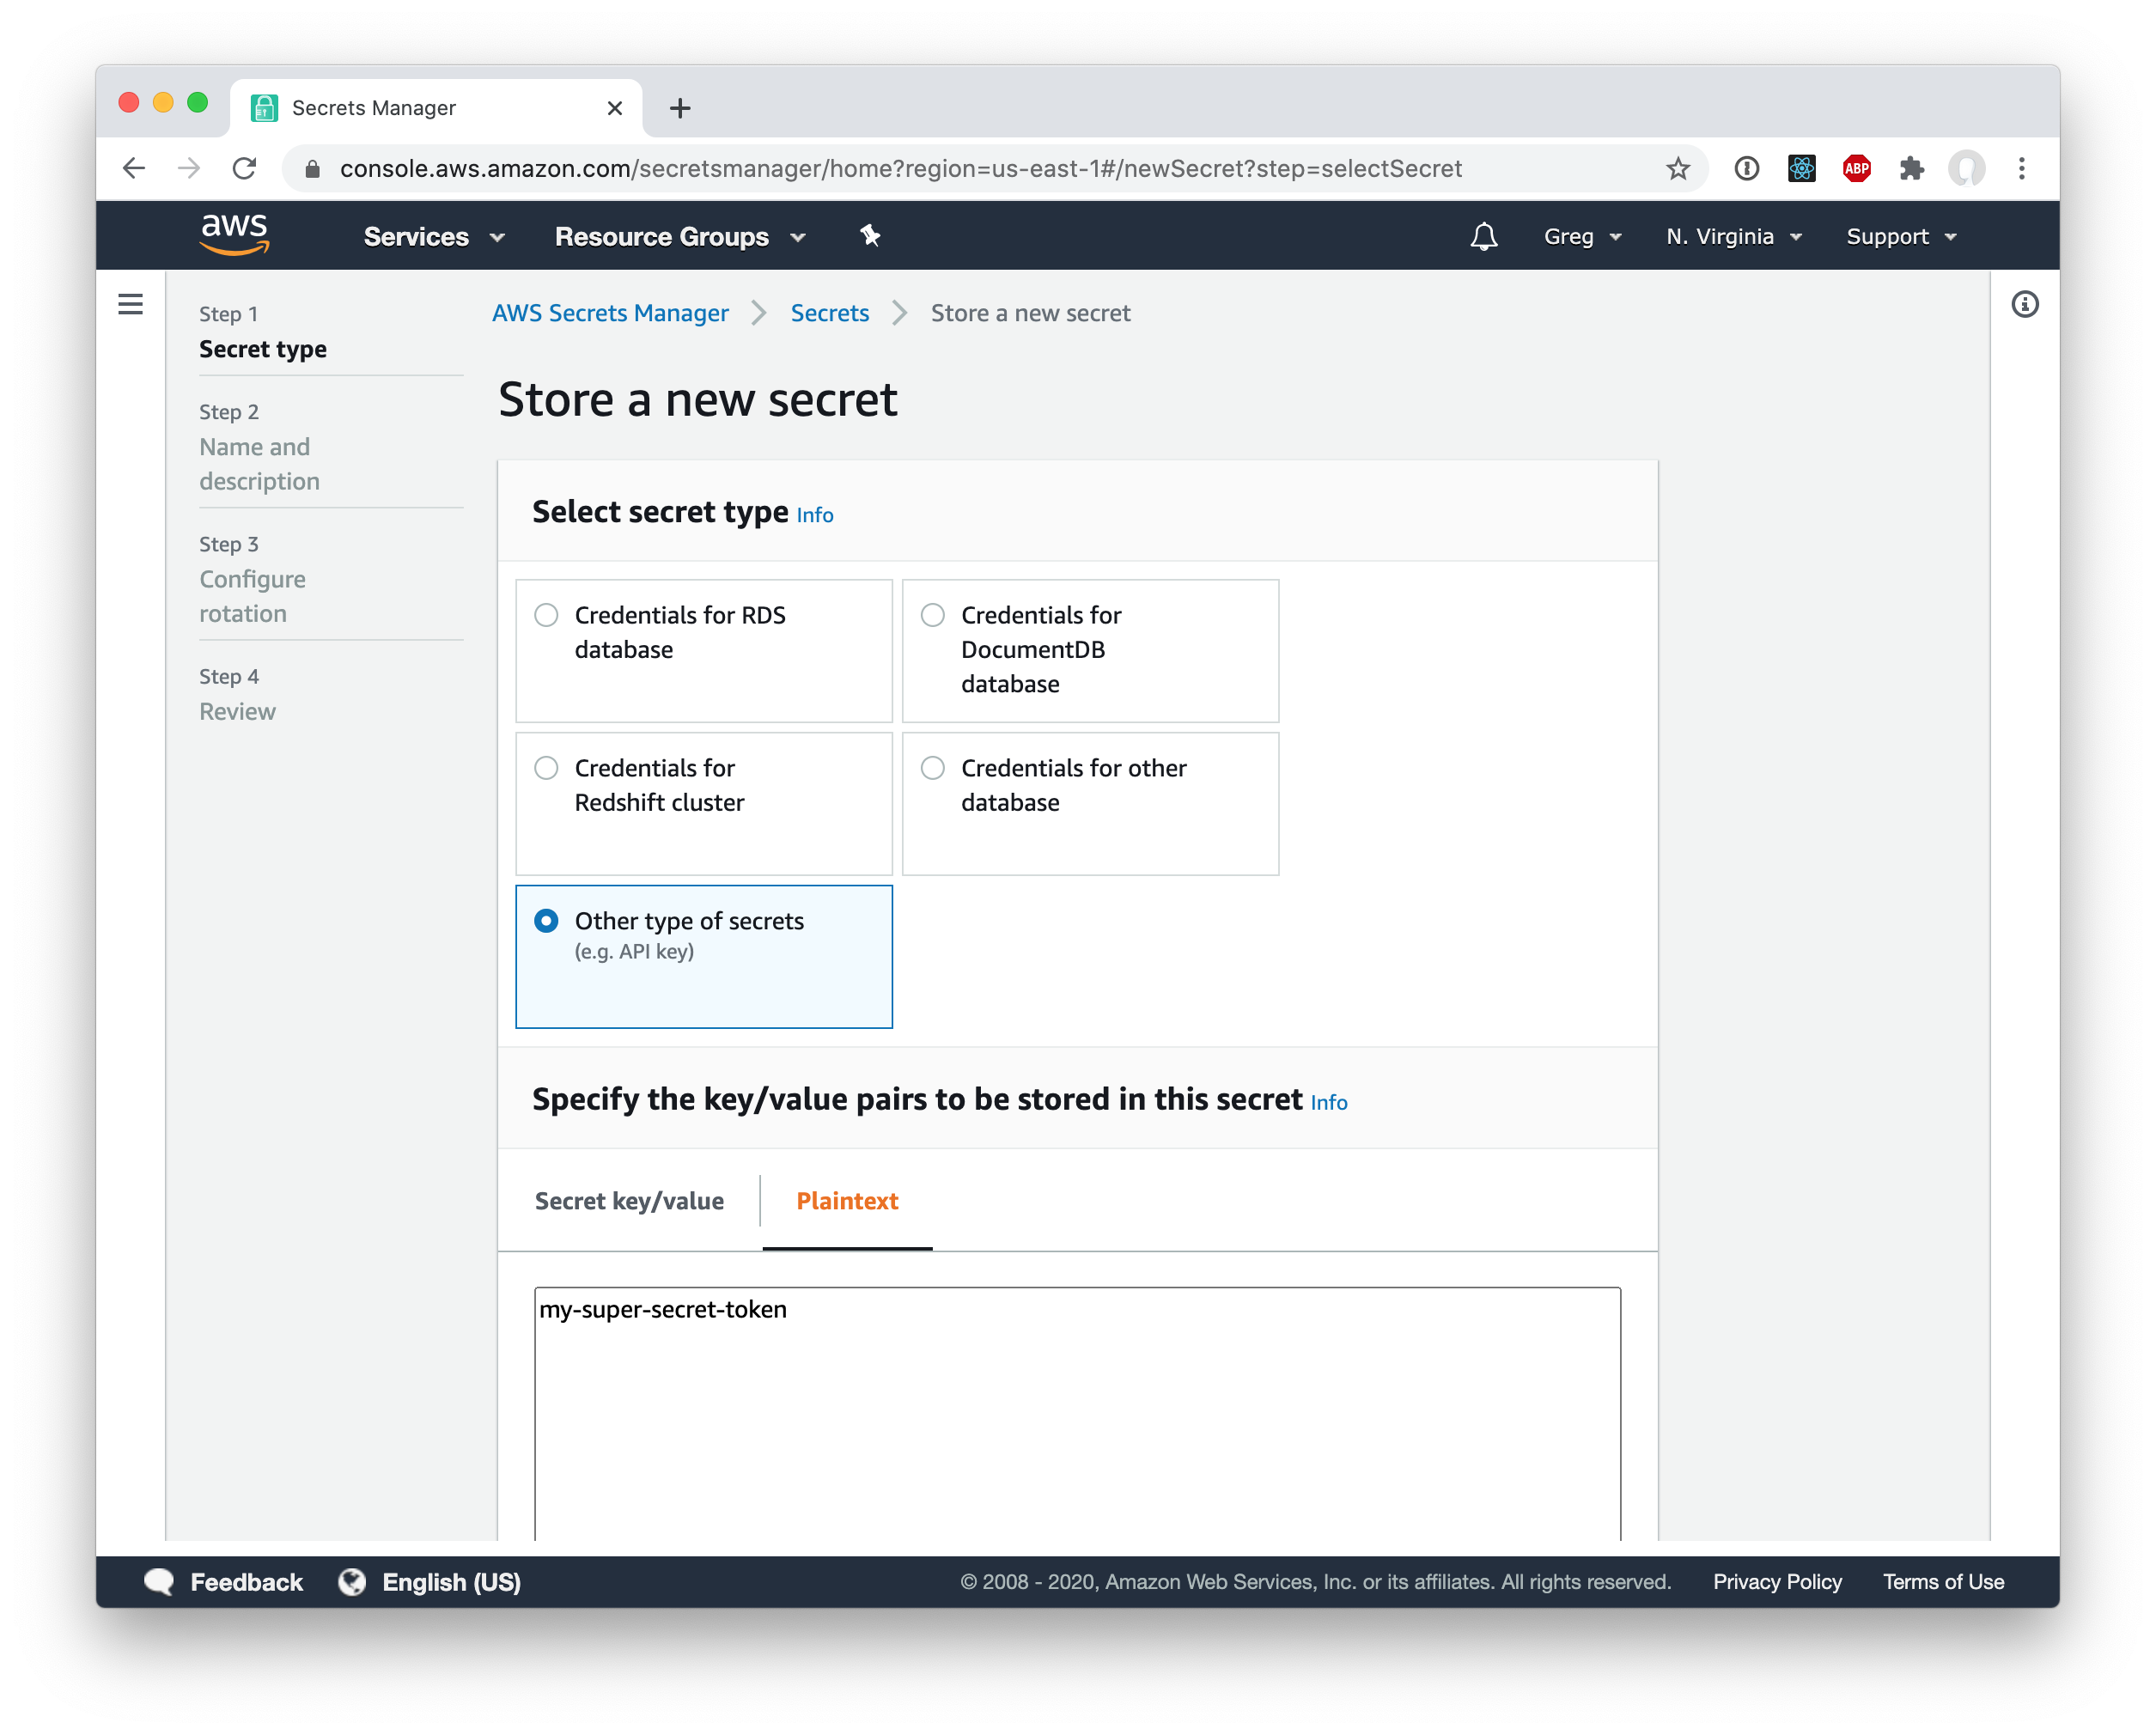
Then just give the secret a name (I called mine gdpotter-github) and continue to save the secret.
Also, I am assuming that you already have a Route53 hosted zone set up. If you don’t, you can follow the AWS guide for that (or probably countless other tutorials on the internet.)
Webpack configuration
In order to configure aggressive caching we need to make sure all static asssts (js, css, etc) are stored with a hash in the filename. Then, when the assets change, so do the file names and the browsers know to download a new file.
We also want to store all of our static files in a separate sub-directory (I called mine /static). This will help us later when setting up the CodePipeline. We’ll specify different caching headers for everything in that directory.
First, we need to set the output:
output: {
  path: path.join(__dirname, '/dist'),
  filename: process.env.production ? 'static/bundle.min.[contenthash].js' : 'static/bundle.min.[hash].js',
  publicPath: '/'
}
You’ll notice that I’m using [contenthash] for production but otherwise using [hash]. That’s because I am using hot module replacement along with webpack-dev-server when running locally. If you attempt to use [contenthash] you will see an error like the following when starting:
Cannot use [chunkhash] or [contenthash] for chunk in ‘static/bundle.min.[contenthash].js’ (use [hash] instead)
If you have any other types of output files (such as using MiniCssExtractPlugin or FaviconsWebpackPlugin), you’ll want to add /static to the output as well.
Next, you can run yarn run build (or you can use npm if you prefer) to build the dist directory. The output should look something like the following:
dist
├── index.html
└── static
    ├── 103b5fa18196d5665a7e12318285c916.svg
    └── bundle.min.e0bbd73336e3e1ed23cf.js
You can view the entire file here.
AWS CDK Configuration
If you haven’t already, go ahead and install/configure cdk using the AWS guide. I’m going to use typescript but if you want to use something else you should be able to easily translate my configuration. Make sure you install all of the following dependencies:
$ npm install @aws-cdk/core @aws-cdk/aws-s3 @aws-cdk/aws-cloudfront @aws-cdk/aws-iam @aws-cdk/aws-codebuild @aws-cdk/aws-codepipeline @aws-cdk/aws-codepipeline-actions @aws-cdk/aws-route53 @aws-cdk/aws-route53-targets @aws-cdk/aws-certificatemanager
Then go ahead and create a new empty stack. I’ve called mine ReactSampleStack and the file should look something like this:
import {App, Stack, StackProps} from "@aws-cdk/core";

export class ReactSampleStack extends Stack {

  constructor(app: App, id: string, props?: StackProps) {
    super(app, id, props);


  }
}
S3 Bucket and CloudFront Configuration
First, you’ll need to create a bucket:
const webappBucket = new Bucket(this, 'Bucket', {
  bucketName: '<your bucket name>'
});
And an OAI and IAM policy that we will later grant to the CloudFront distribution:
const cloudFrontOAI = new OriginAccessIdentity(this, 'OAI', {
  comment: 'OAI for react sample webapp.',
});

const cloudfrontS3Access = new PolicyStatement();
cloudfrontS3Access.addActions('s3:GetBucket*');
cloudfrontS3Access.addActions('s3:GetObject*');
cloudfrontS3Access.addActions('s3:List*');
cloudfrontS3Access.addResources(webappBucket.bucketArn);
cloudfrontS3Access.addResources(`${webappBucket.bucketArn}/*`);
cloudfrontS3Access.addCanonicalUserPrincipal(
  cloudFrontOAI.cloudFrontOriginAccessIdentityS3CanonicalUserId
);

webappBucket.addToResourcePolicy(cloudfrontS3Access);
You’ll find a lot of guides online telling you to enable static site hosting for the s3 bucket. We are not doing that because we don’t actually want the bucket to be public and we instead want to host the content via CloudFront. Why? For starters, S3’s native static site hosting does not support HTTPS certificates.
Speaking of certificates, let’s use AWS’s Certificate Manager to generate an SSL cert. Since we already have a Route53 hosted zone, we can do DNS Validation right from CDK:
const hostedZone = HostedZone.fromLookup(this, 'HostedZone', {
  domainName: 'gdpotter.com',
  privateZone: false
});

const certificate = new DnsValidatedCertificate(this, 'Certificate', {
  domainName: 'react-test.gdpotter.com',
  hostedZone
});
And now we’ll create the CloudFront distribution to point to that s3 bucket:
const distribution = new CloudFrontWebDistribution(this, 'Cloudfront', {
  originConfigs: [
    {
      s3OriginSource: {
        s3BucketSource: webappBucket,
        originAccessIdentity: cloudFrontOAI
      },
      behaviors: [
        {isDefaultBehavior: true}
      ]
    }
  ],
  errorConfigurations: [
    {
      errorCode: 404,
      responseCode: 200,
      responsePagePath: '/index.html',
      errorCachingMinTtl: 0
    }
  ],
  priceClass: PriceClass.PRICE_CLASS_100,
  aliasConfiguration: {
    acmCertRef: certificate.certificateArn,
    names: ['react-test.gdpotter.com']
  }
});
You can see that we are rewriting 404 errors as 200’s pointing to /index.html. That is so that if you are using something like react-router and the user can go to http://mysite.com/some-path. There is no some-path file or directory in s3 but as long as we serve the index.html file, the JavaScript will know how to handle that request.
You’ll also notice that I’m using PRICE_CLASS_100. That’s purely optional and I’m doing it just because I’m cheap. You can learn more about price classes here.
And finally we will create an DNS record to point to our new distribution:
new ARecord(this, 'Alias', {
  zone: hostedZone,
  recordName: 'react-test',
  target: RecordTarget.fromAlias(new CloudFrontTarget(distribution))
});
Using CodePipeline to build/deploy the webpack project
At this point you can run cdk deploy and see a fully functional S3 bucket serving content via CloudFront. The only problem is that there’s nothing in the bucket yet! You could drop some files in there by hand but we want this to be fully automated.
There’s going to be 3 different artifacts in this pipeline. One for the sources (from GitHub) and two for the webpack output. I’m going to be separating the index.html from the static assets. So let’s configure those now:
const sourceOutput = new Artifact();
const buildHtmlOutput = new Artifact('base');
const buildStaticOutput = new Artifact('static');
Our pipeline is going to have 3 stages which I will talk abut individually:
new Pipeline(this, 'Pipeline', {
  stages: [
  ]
});
First, we need to get the sources from GitHub. This is where that token from earlier comes into play. This uses the gdpotter-github token to access the gdpotter/webpack-react-sample repository:
{
  stageName: 'Source',
  actions: [
    new GitHubSourceAction({
      actionName: 'Checkout',
      owner: 'gdpotter',
      repo: 'webpack-react-sample',
      oauthToken: SecretValue.secretsManager('gdpotter-github'),
      output: sourceOutput,
      trigger: GitHubTrigger.WEBHOOK,
    })
  ]
},
Next we will use AWS CodeBuild to actually invoke webpack and build the project. I’m putting the buildspec directly in the CDK stack but you could also define in the the repo. I like having it here so that I can reference the artifact names rather than rely on matching those up across different files.
{
  stageName: 'Build',
  actions: [
    new CodeBuildAction({
      actionName: 'Webapp',
      project: new PipelineProject(this, 'Build', {
        projectName: 'ReactSample',
        buildSpec: BuildSpec.fromObject({
          version: '0.2',
          phases: {
            install: {
              commands: [
                'npm install'
              ]
            },
            build: {
              commands: 'npm run build'
            }
          },
          artifacts: {
            'secondary-artifacts': {
              [buildHtmlOutput.artifactName as string]: {
                'base-directory': 'dist',
                files: [
                  '*'
                ]
              },
              [buildStaticOutput.artifactName as string]: {
                'base-directory': 'dist',
                files: [
                  'static/**/*'
                ]
              }
            }
          }
        }),
        environment: {
          buildImage: LinuxBuildImage.STANDARD_4_0,
        }
      }),
      input: sourceOutput,
      outputs: [buildStaticOutput, buildHtmlOutput]
    })
  ]
},
Here I define two different artifacts:
- One for everything in the root directory (but not any child directories) using the
*matcher - One for everything in the
staticdirectory and all its children using thestatic/**/*matcher
Finally, we need to deploy everything to S3 so that it can be served:
{
  stageName: 'Deploy',
  actions: [
    new S3DeployAction({
      actionName: 'Static-Assets',
      input: buildStaticOutput,
      bucket: webappBucket,
      cacheControl: [CacheControl.setPublic(), CacheControl.maxAge(Duration.days(1))],
      runOrder: 1
    }),
    new S3DeployAction({
      actionName: 'HTML-Assets',
      input: buildHtmlOutput,
      bucket: webappBucket,
      cacheControl: [CacheControl.noCache()],
      runOrder: 2
    })
  ]
}
This results in the cache-control header to public, max-age: 86400 for everything in the static directory and no-cache for the index.html. Not that I’m using runOrder to make sure that the assets get deployed before the HTML. That way, in case a user tries to load the site during a deploy (or worse, if an error occurs halfway through) they won’t get a broken experience from missing assets.
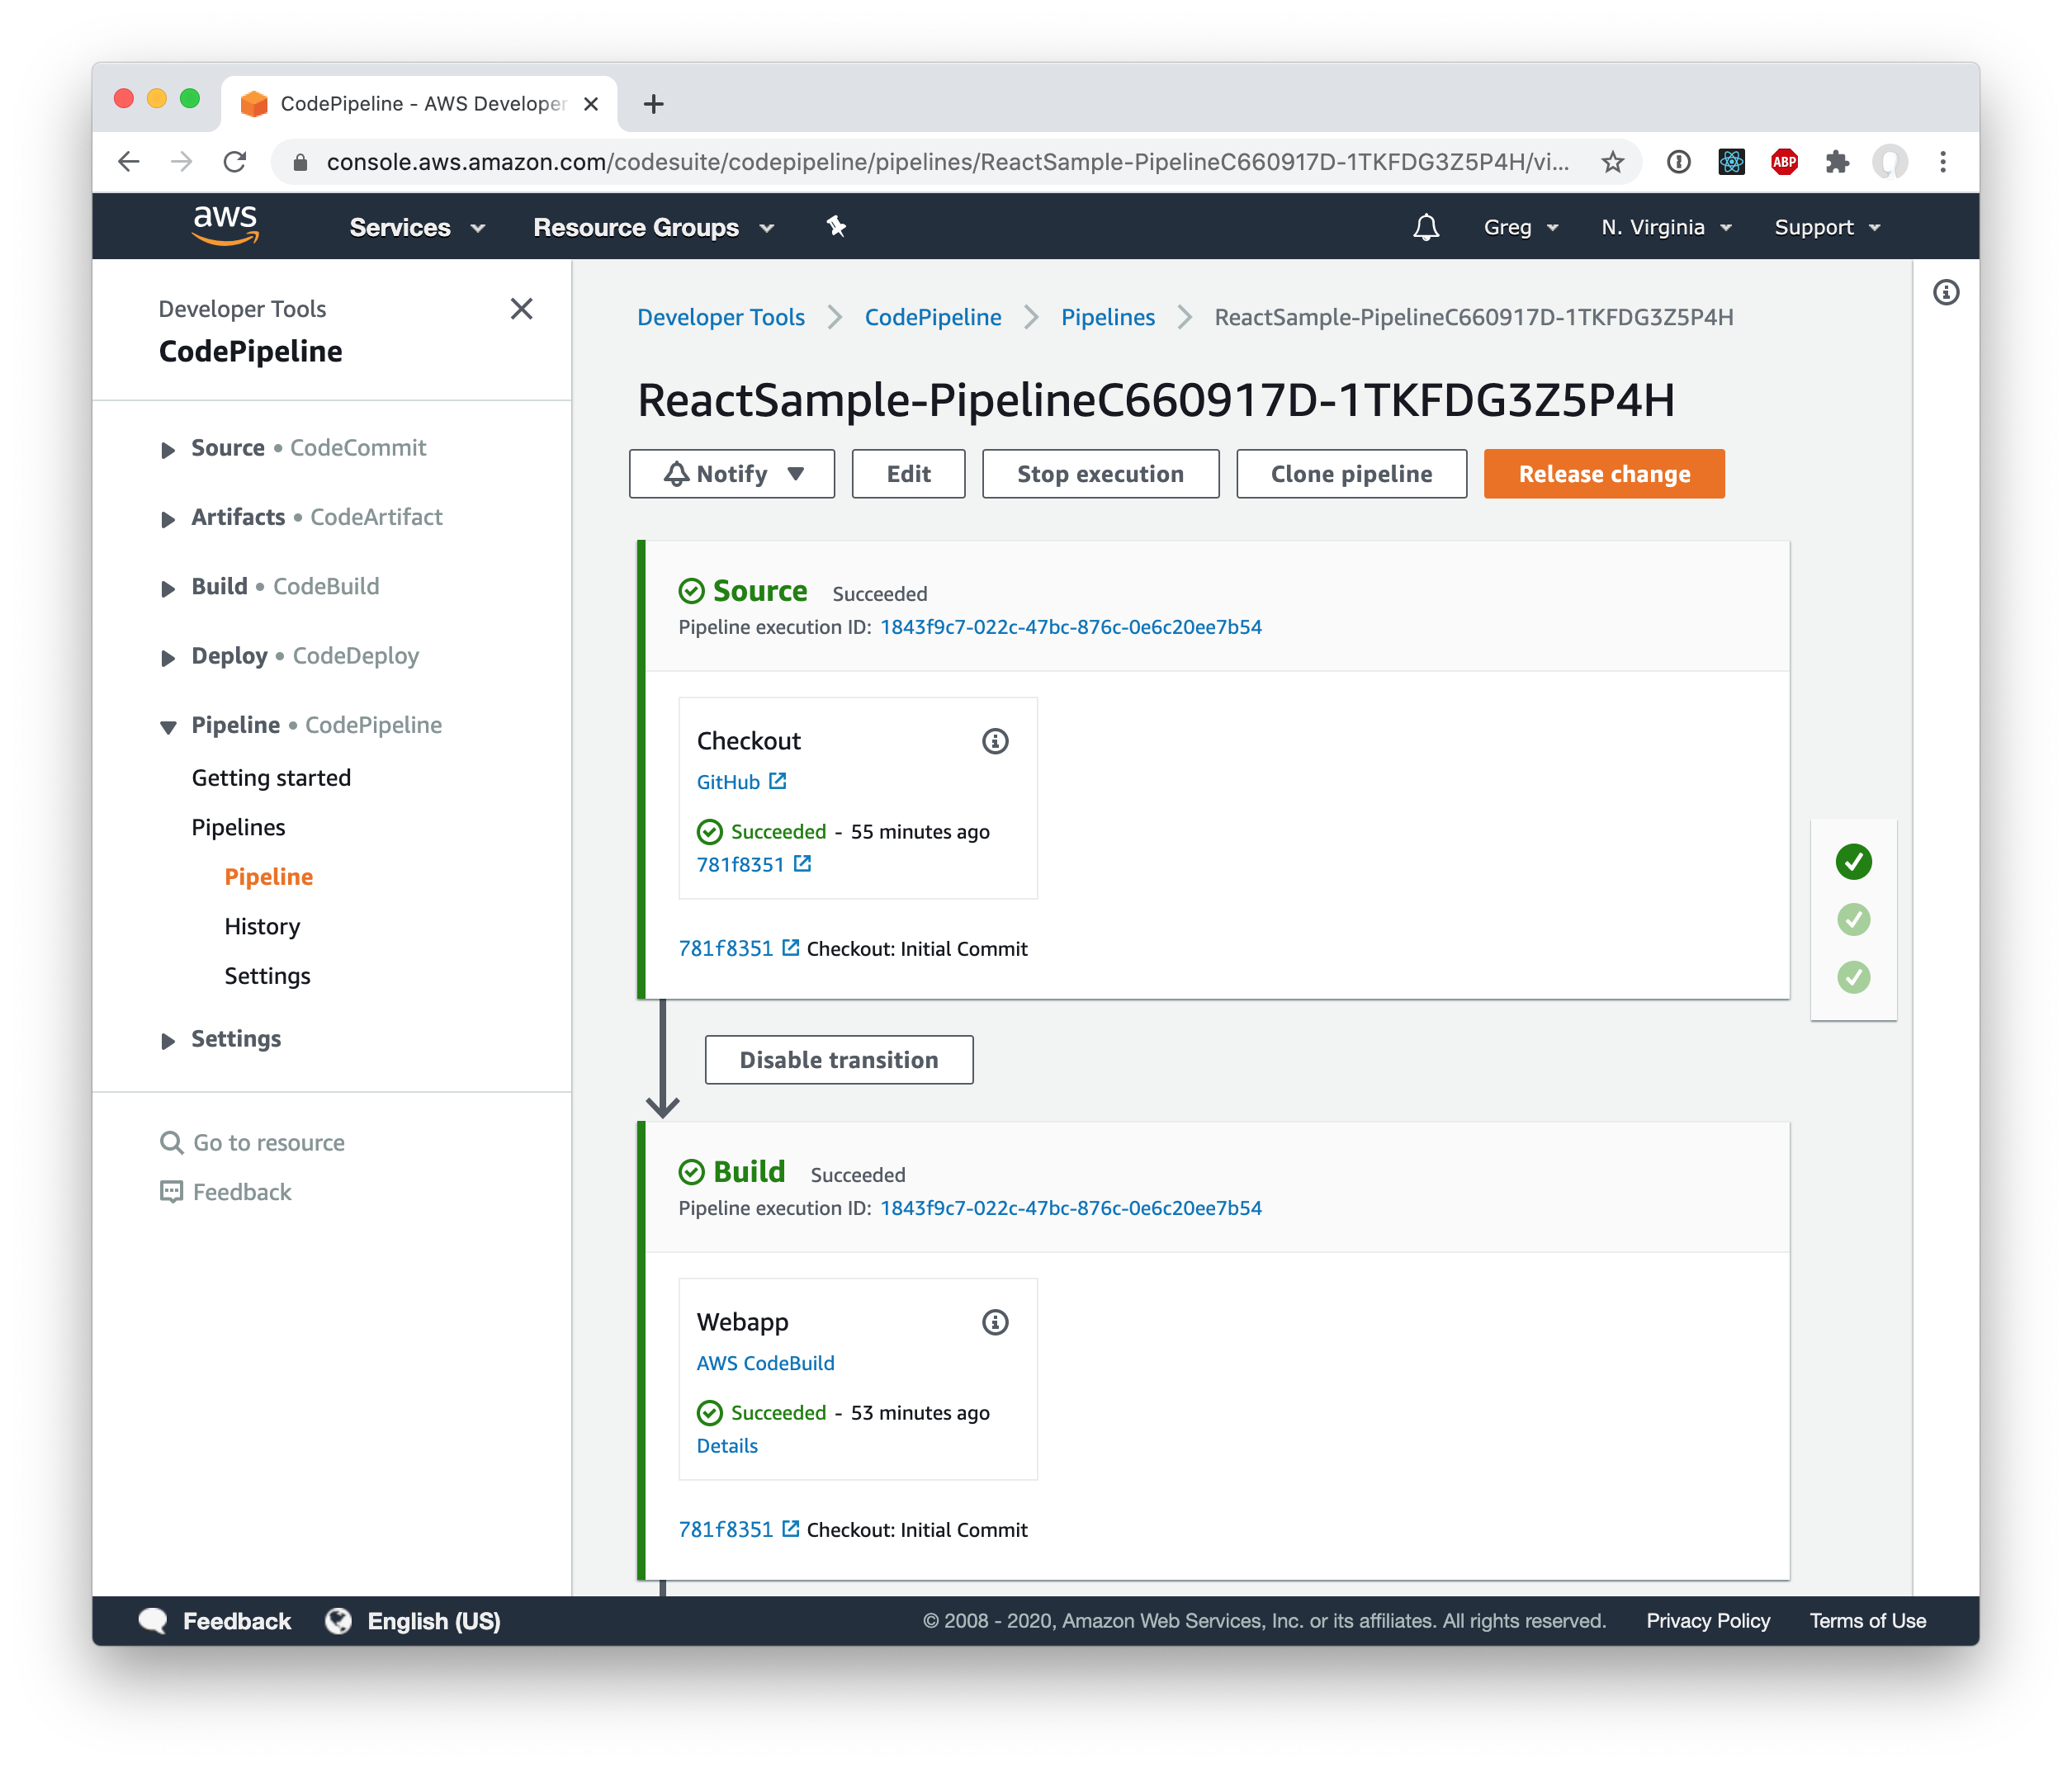
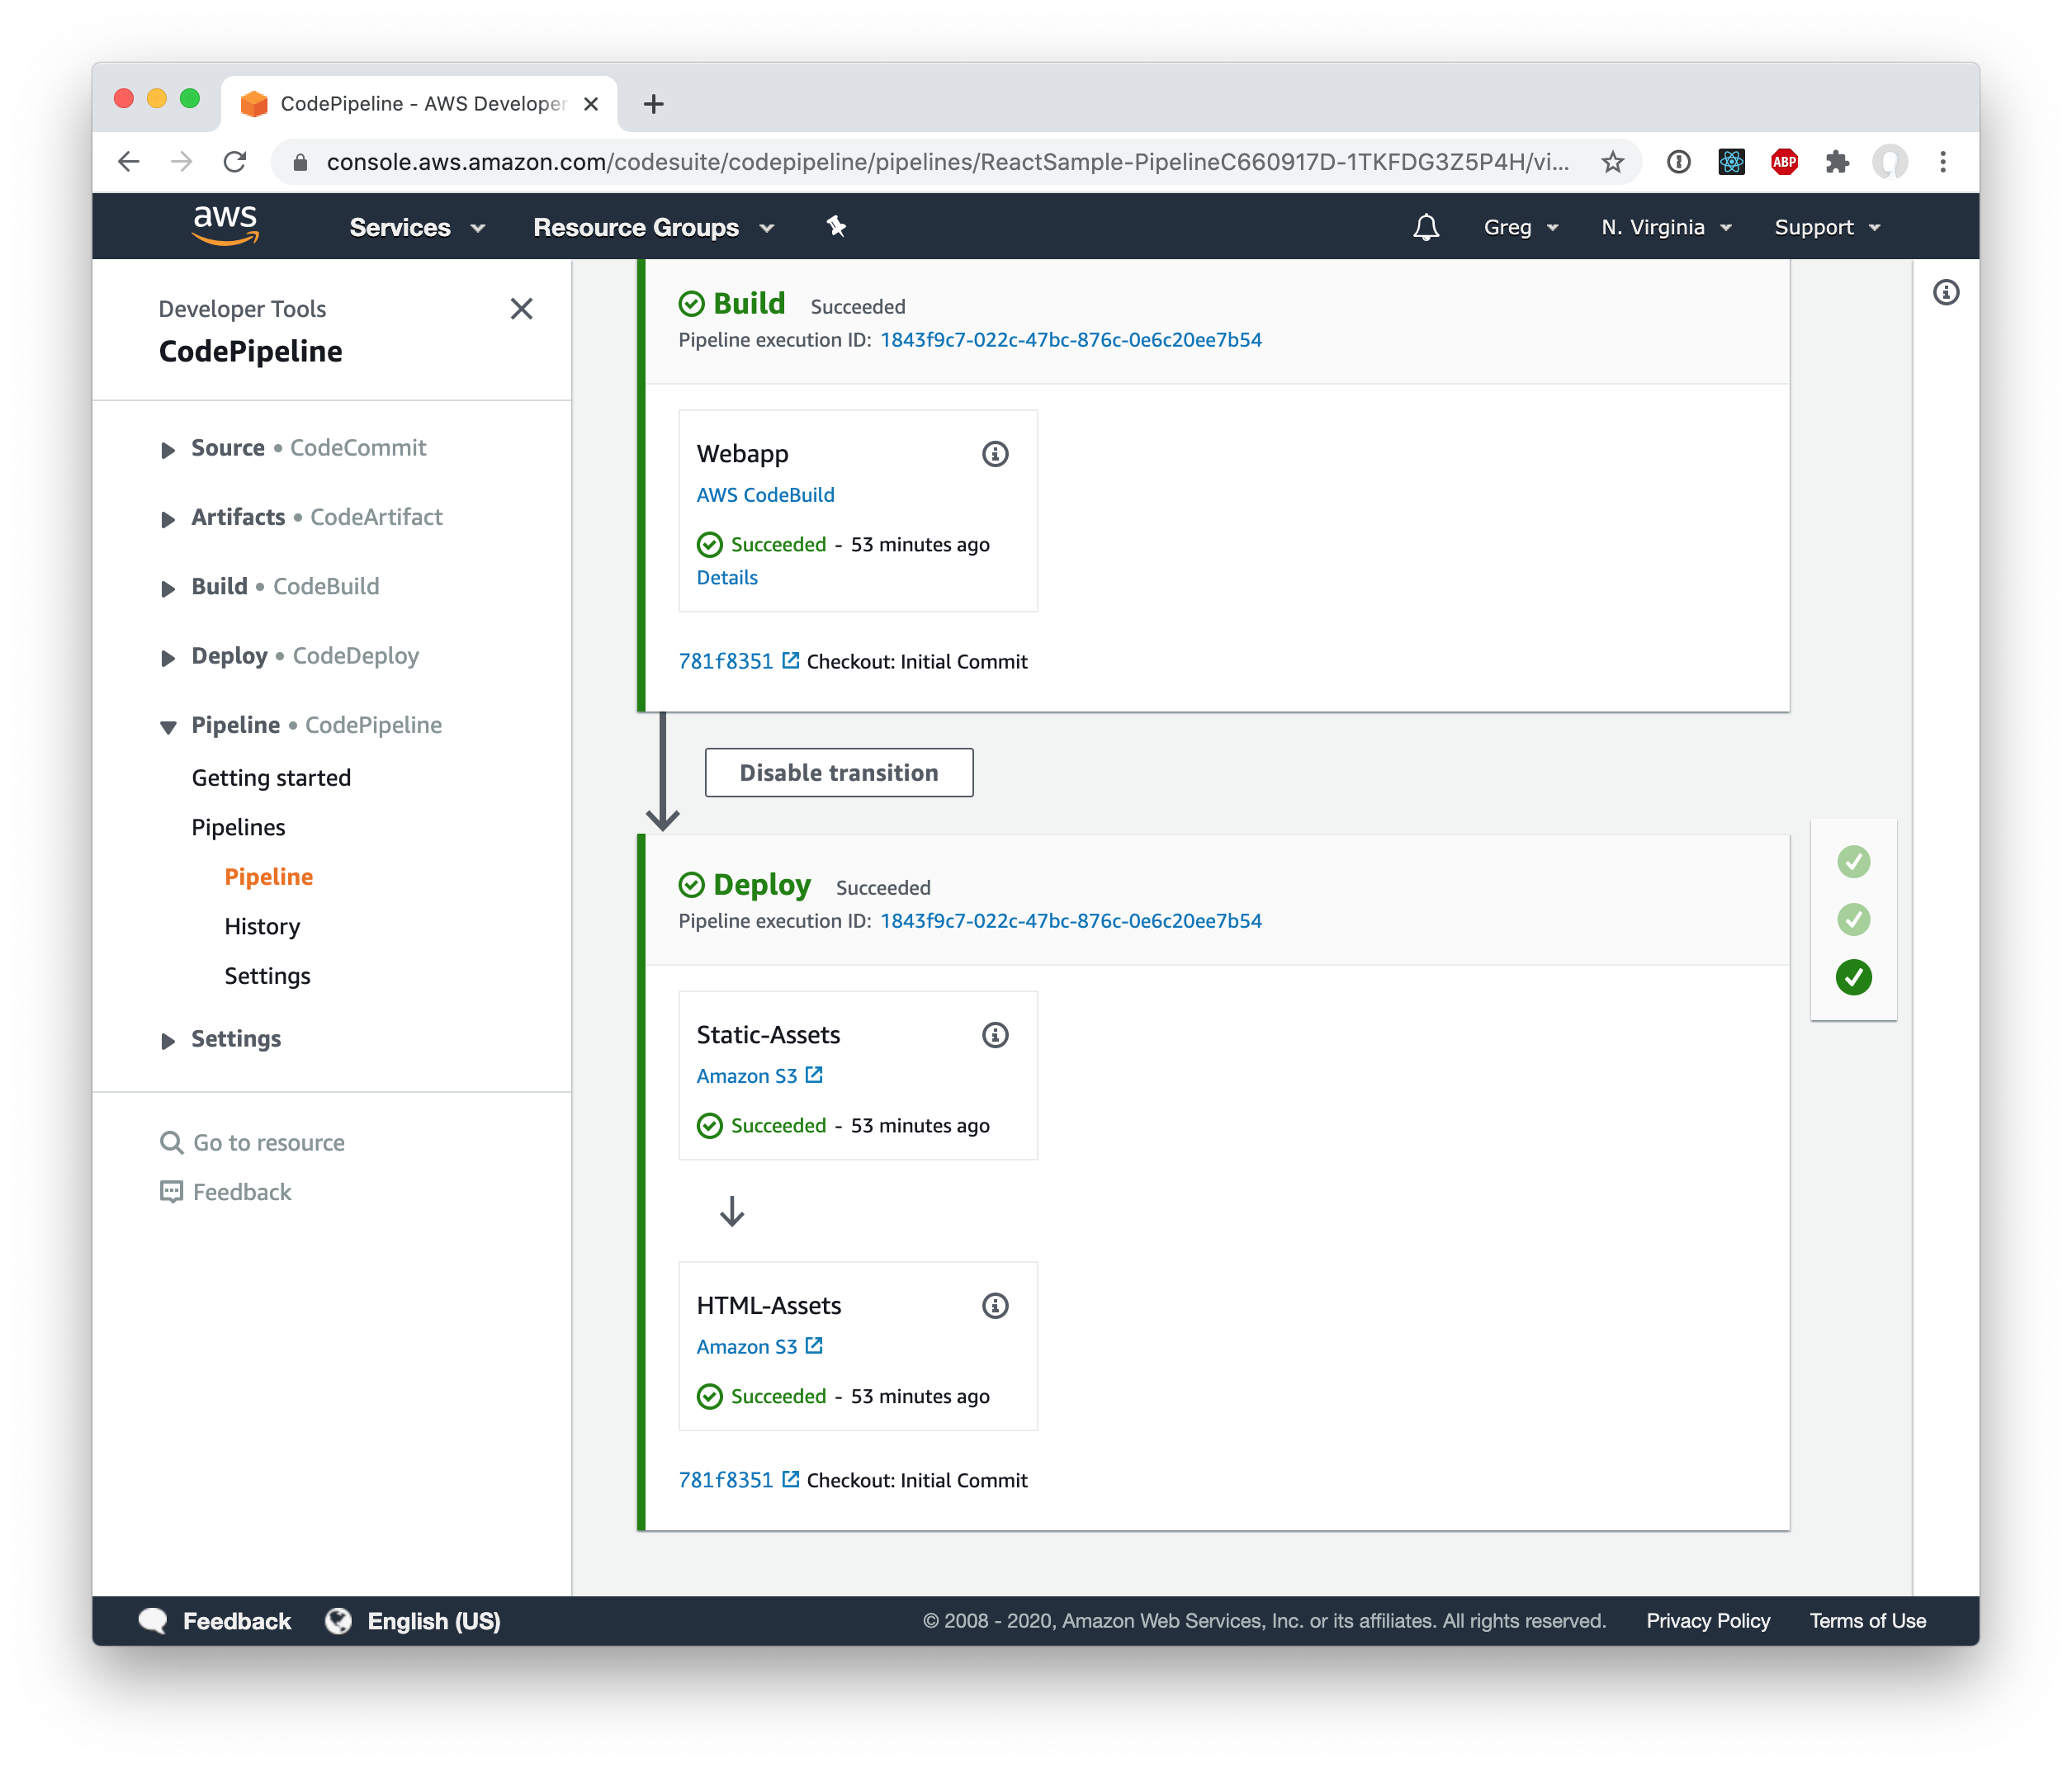
You can see the finished pipeline here:
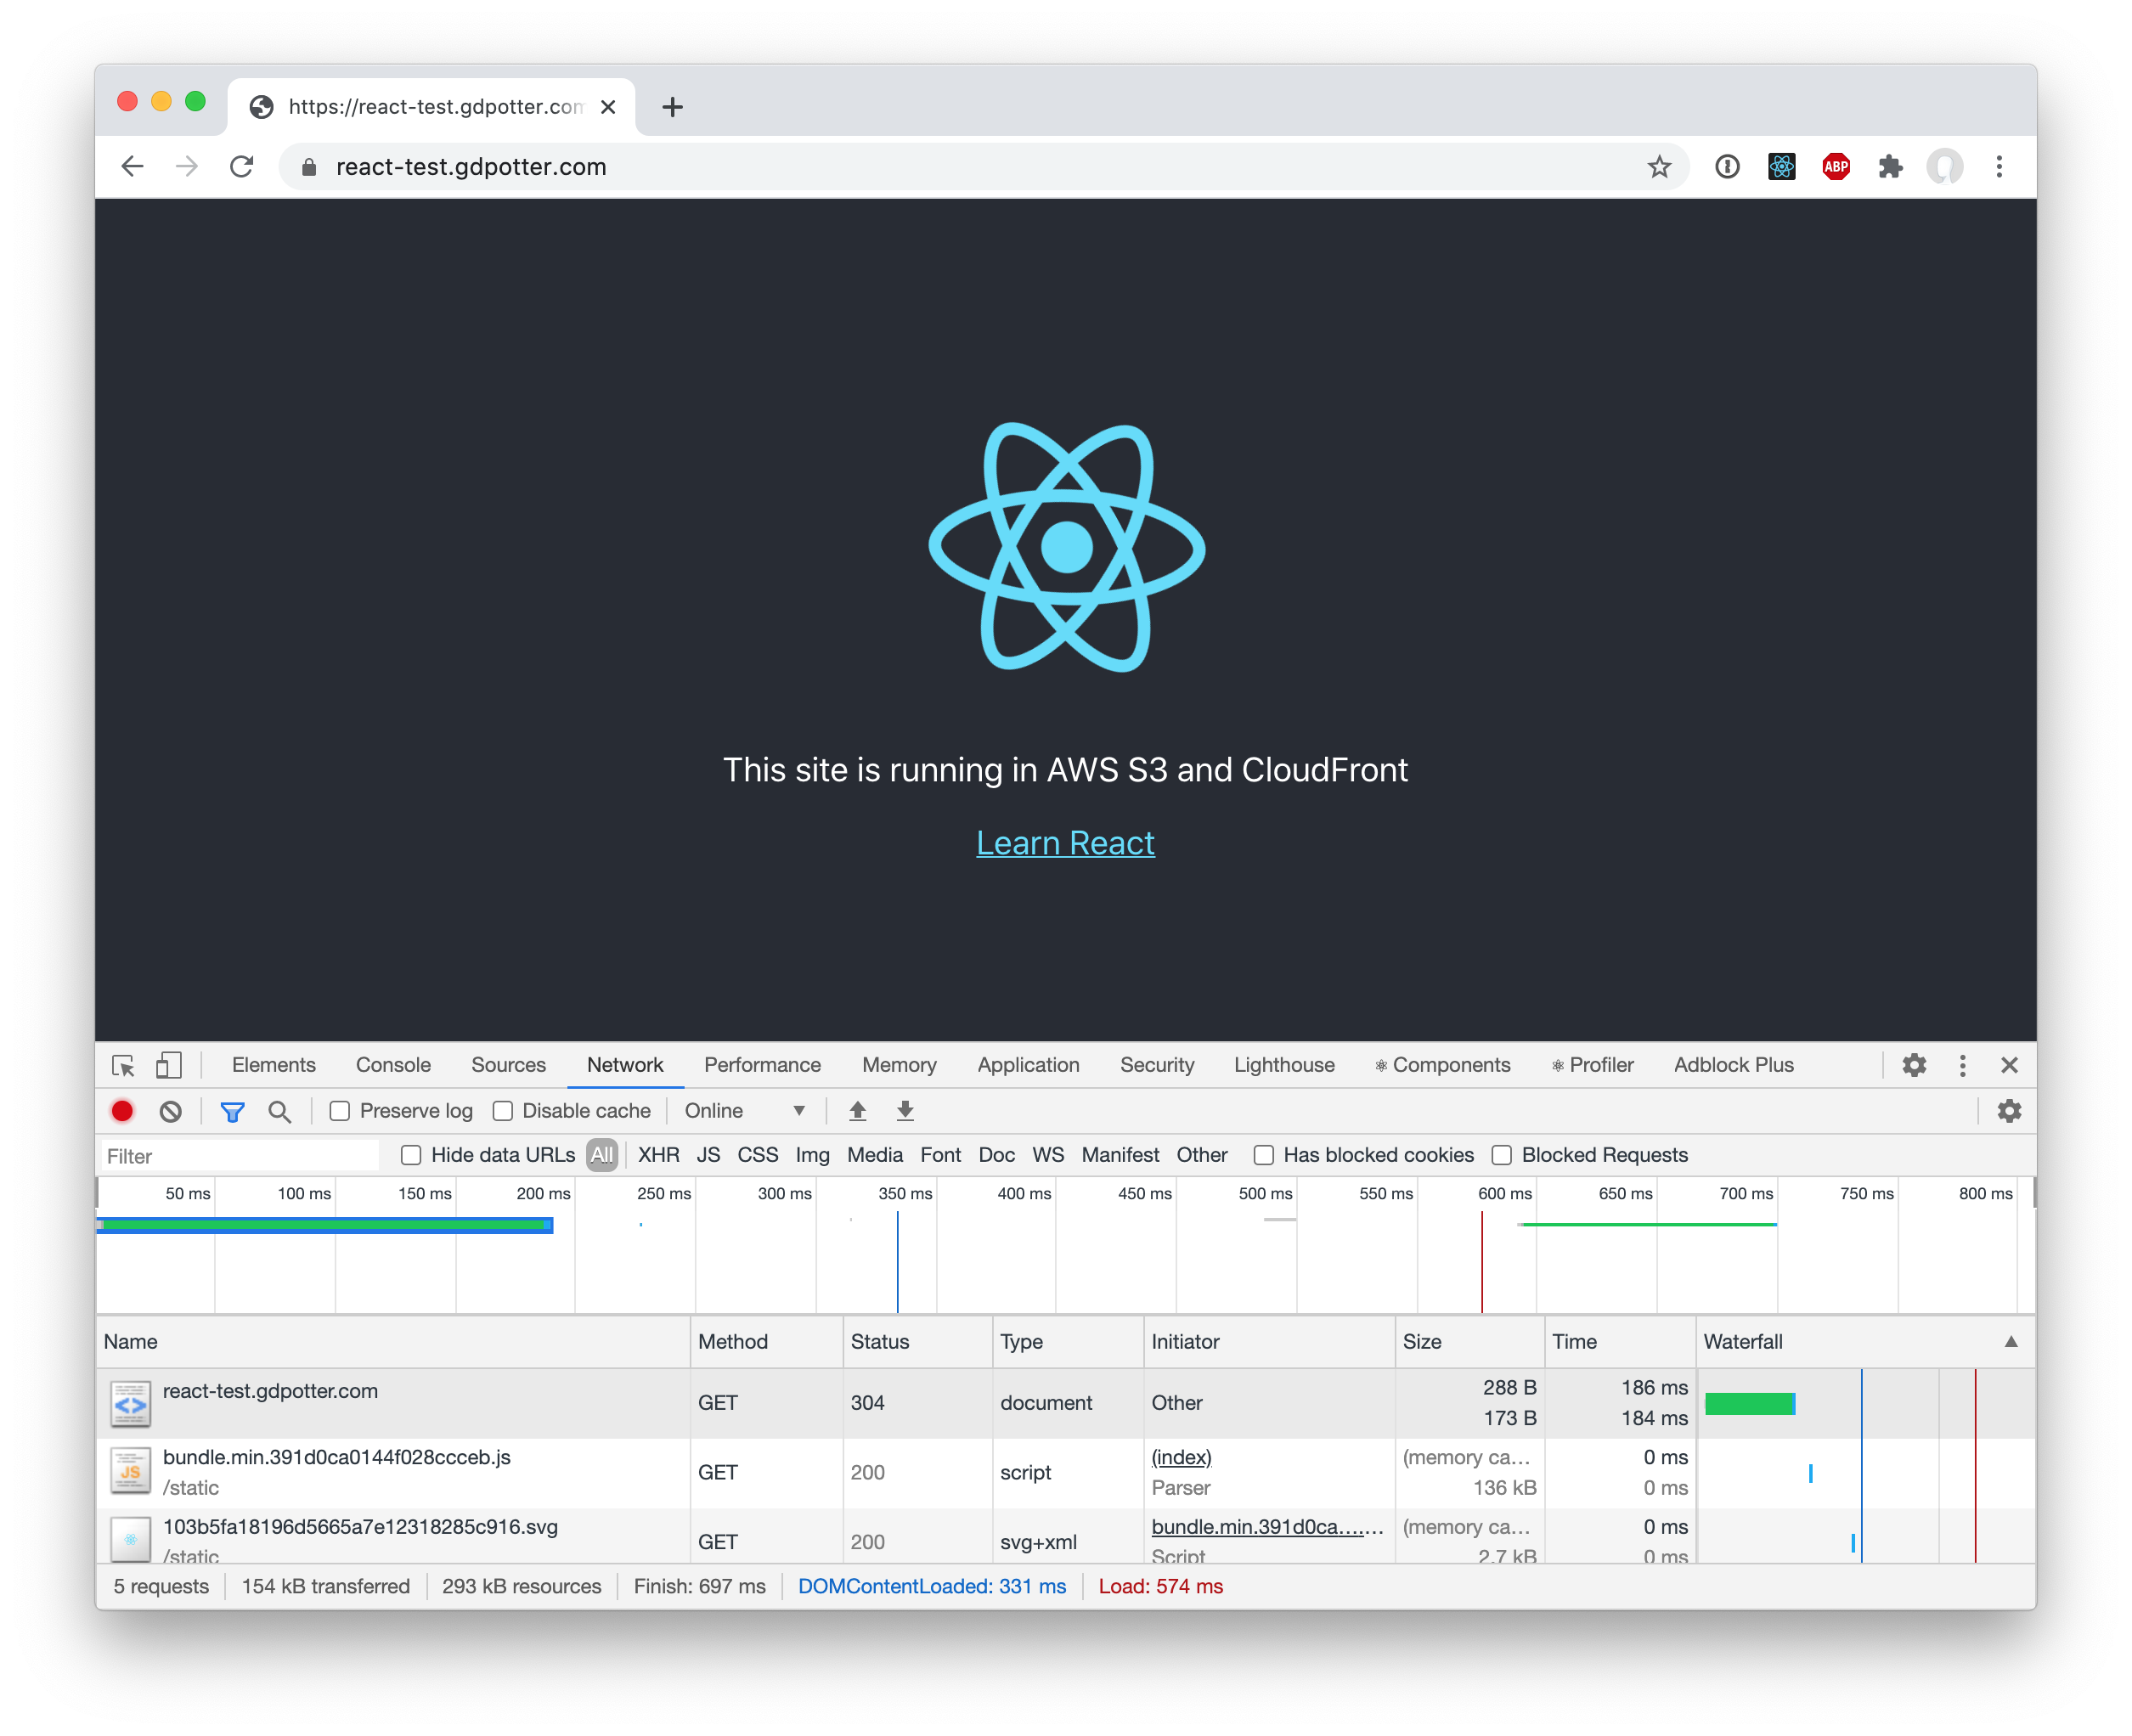
And if you load the site, you can see that subsequent loads will load the assets from the browser’s cache!
You can see the browse the final CDK Stack and web app on GitHub.